
The Scheduler runs tests automatically on a schedule, so you don't have to launch them manually. You define the test input once — sender IDs, texts, destinations, and suppliers — and set when and how often the batches should run. Tests can be sent once at a set time, or repeated on a recurring schedule for as long as you need.
It's useful whenever you want ongoing, hands-off monitoring of your routes rather than one-off checks. Common cases:
-
Continuous route monitoring — keep testing key destinations around the clock to catch problems as they appear
-
Off-hours and overnight coverage — run tests when no one is at the desk
-
Randomized testing — spread batches across random times so vendors can't recognize and special-case your test traffic
-
Recurring quality checks — verify sender ID and content integrity, delivery, and delay on a regular cadence
For each scheduled task you can set up email alerts and reports on the conditions that matter to you — fake DLRs, delivery delays, sender ID or text changes, and more — so you're notified when something goes wrong without watching the results yourself.
The Scheduler is available to customers integrated with TelQ via SMPP.
Schedules page
The Schedules page lists all scheduled tasks created across your company. Use Show my tasks only to narrow the list to tasks you created.
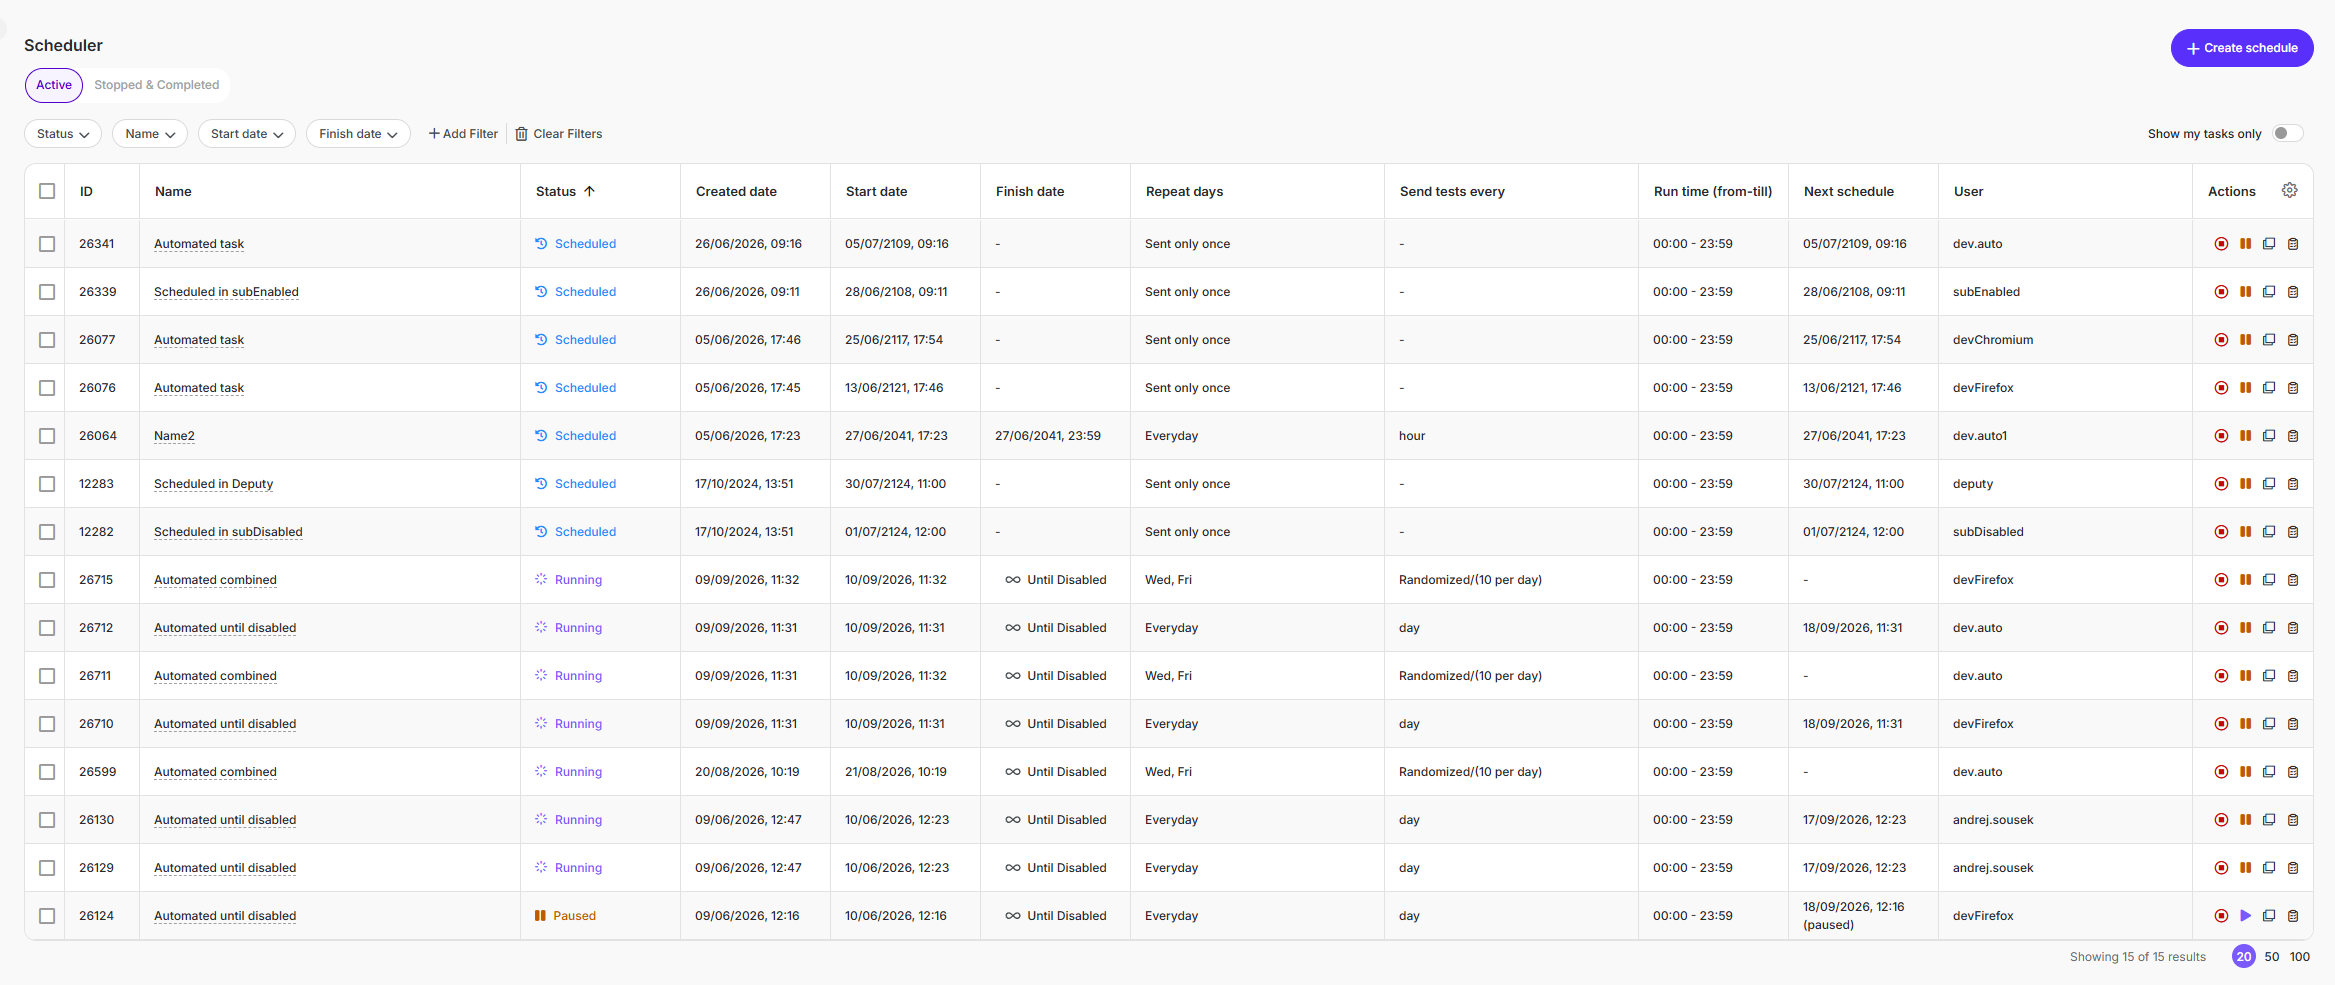
The list is split into two tabs:
-
Active — tasks that are Running or Paused
-
Stopped & Completed — tasks that were stopped manually or reached their finish date
Filter the list by ID, Status, Name, Start date or Finish date.
Statuses
-
Running — active and sending test batches on schedule
-
Paused — temporarily suspended; no tests are sent until resumed
-
Stopped — ended manually. A stopped task cannot be resumed, clone it to run it again
-
Completed — reached its finish date
Columns
-
ID — unique task ID
-
Name — task name, set by the creator. Click it to open the task details
-
Status — Running, Paused, Stopped, or Completed
-
Created date — when the task was created
-
Start date — when the task starts sending
-
Finish date — when the task ends. "Until Disabled" means it runs indefinitely until stopped
-
Repeat days — the weekdays on which batches are sent (e.g. Everyday, or Mon–Fri)
-
Send tests every — the sending frequency. "Randomized/(N per day)" means N batches per day are sent at random times within the run-time window, to conceal your tests from vendors
-
Run time (from-till) — the daily window during which batches can be sent
-
Next schedule — date and time of the next iteration. Empty for randomized tasks, since the exact time is not known in advance; for a paused task it shows the last planned time, marked "(paused)"
-
User — the account that created the task
-
Actions — see below
Use the gear icon in the table header to choose which columns are shown.
Actions
-
Stop — permanently ends the task
-
Pause / Resume — temporarily suspends a Running task and resumes it later (Active tab)
-
Clone — creates a new task with the same configuration, which you can edit before saving. Cloning is the only way to change a task's settings, since existing tasks can't be edited directly
-
Results — opens the results of all executed tests for the task (see below)
Task details
Click a task name to open its summary: schedule configuration, total scheduled and executed tests, content template (sender, text, TelQ ID type/case/length), country/network, supplier, the report conditions ("Reason for report"), and the report email addresses.
Results
The Results view lists every executed test for the task, with an Export button to download them as an Excel file. Use the gear icon in the Actions header to choose which columns are shown.
Creating a new task
To create a scheduled task, click + Create schedule on the Schedules page. The Create schedule wizard opens in three steps: Tests, Tasks, and Reports.
Step 1 — Tests
Define what each test batch will send. This is the same test builder used in Live Number Testing — enter Sender IDs, Text, select Destinations (Country/Network), and choose Suppliers. The gear icon opens the per-test Settings (Test ID Text, Source TON/NPI, data coding, TTL, UDH, TLV, comment). For full details on each input, templates, and settings, see Live Number Testing.
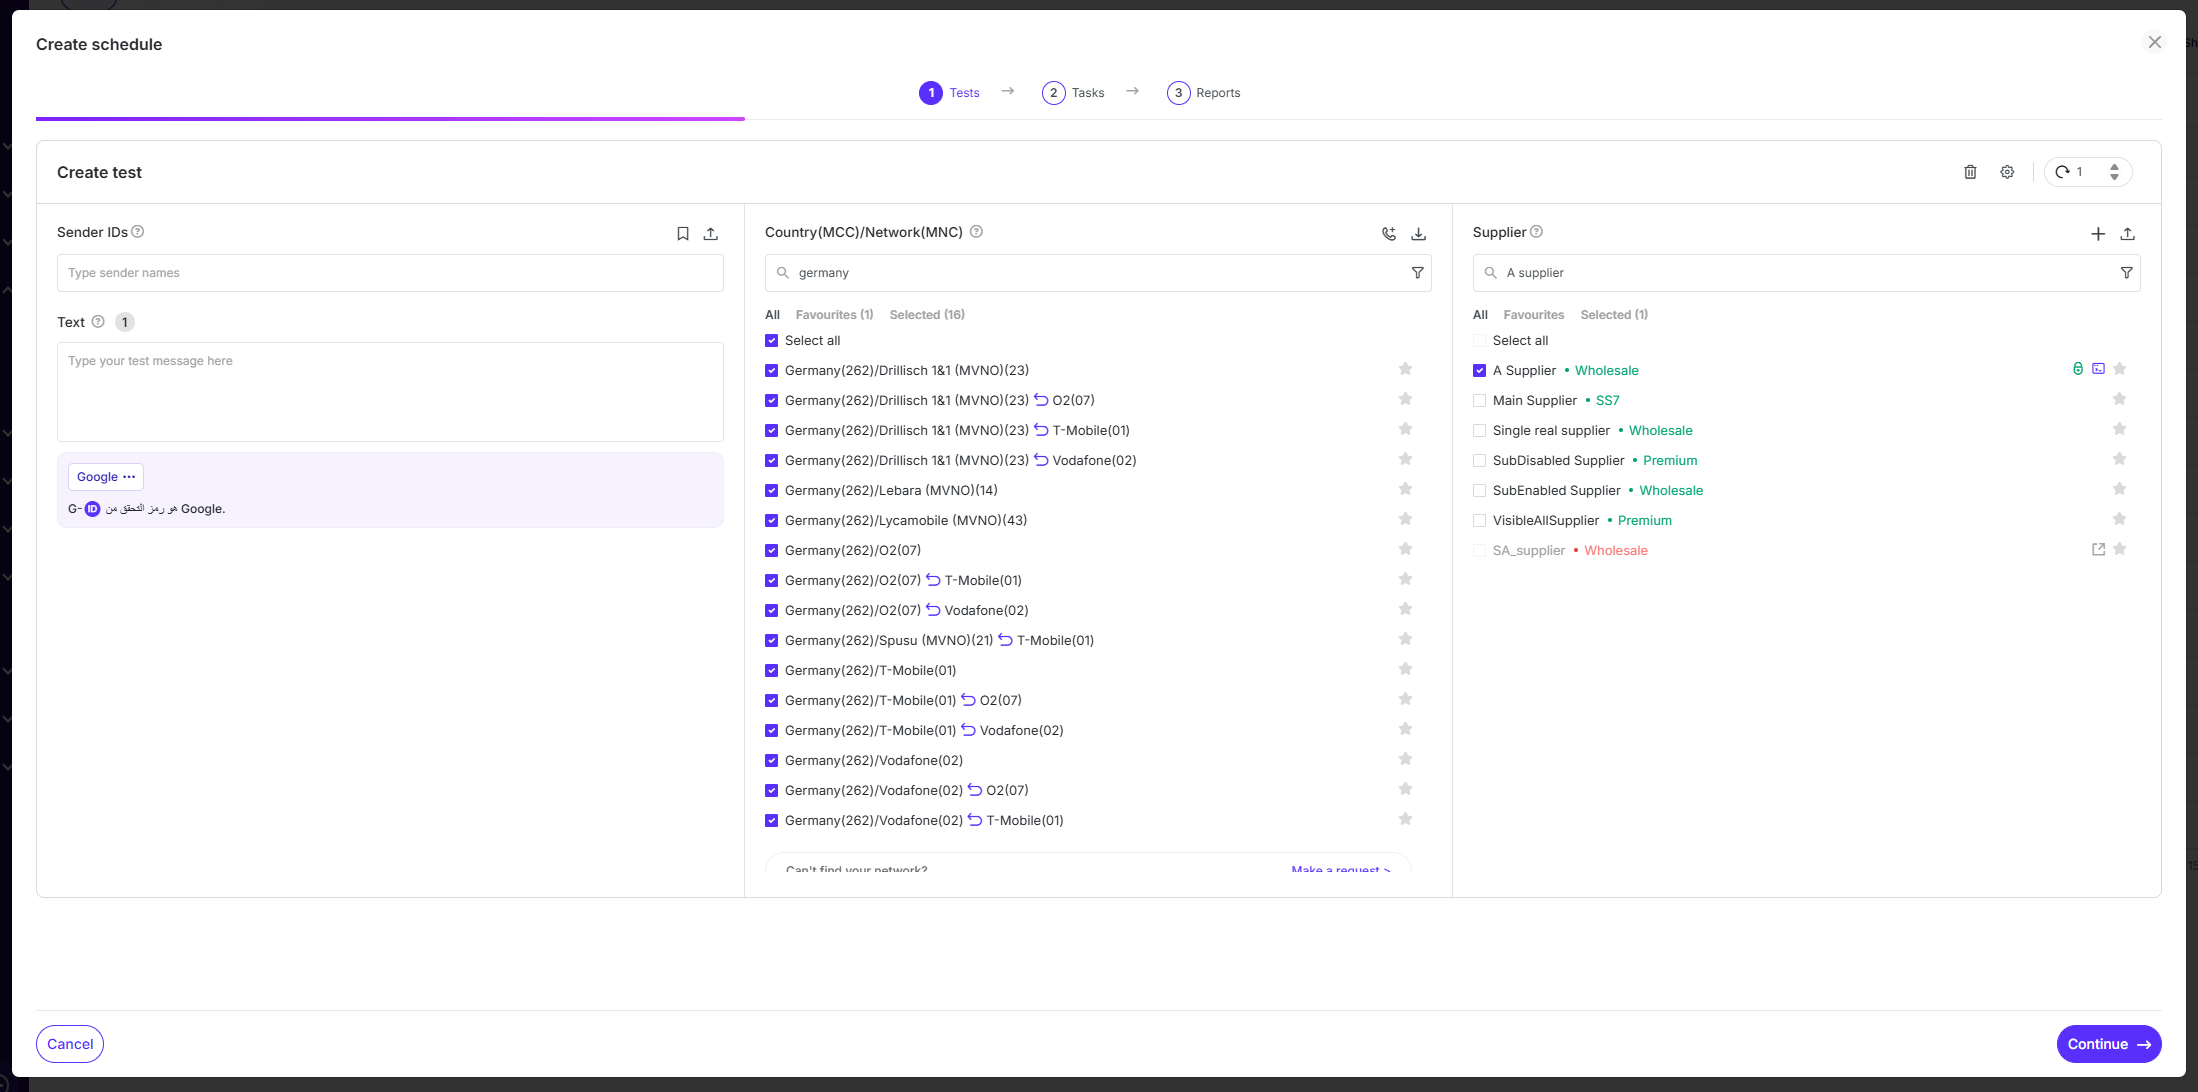
The Repeat counter (top-right of the pop-up) sets how many times the test is sent within each scheduled batch. The batch size shown in Step 2 as "Tests per batch" is the total of all Sender ID × Text × Destination × Supplier combinations, multiplied by the repeat value.
Click Continue to proceed.
Step 2 — Tasks
Set the schedule. Name is required; Description is optional.
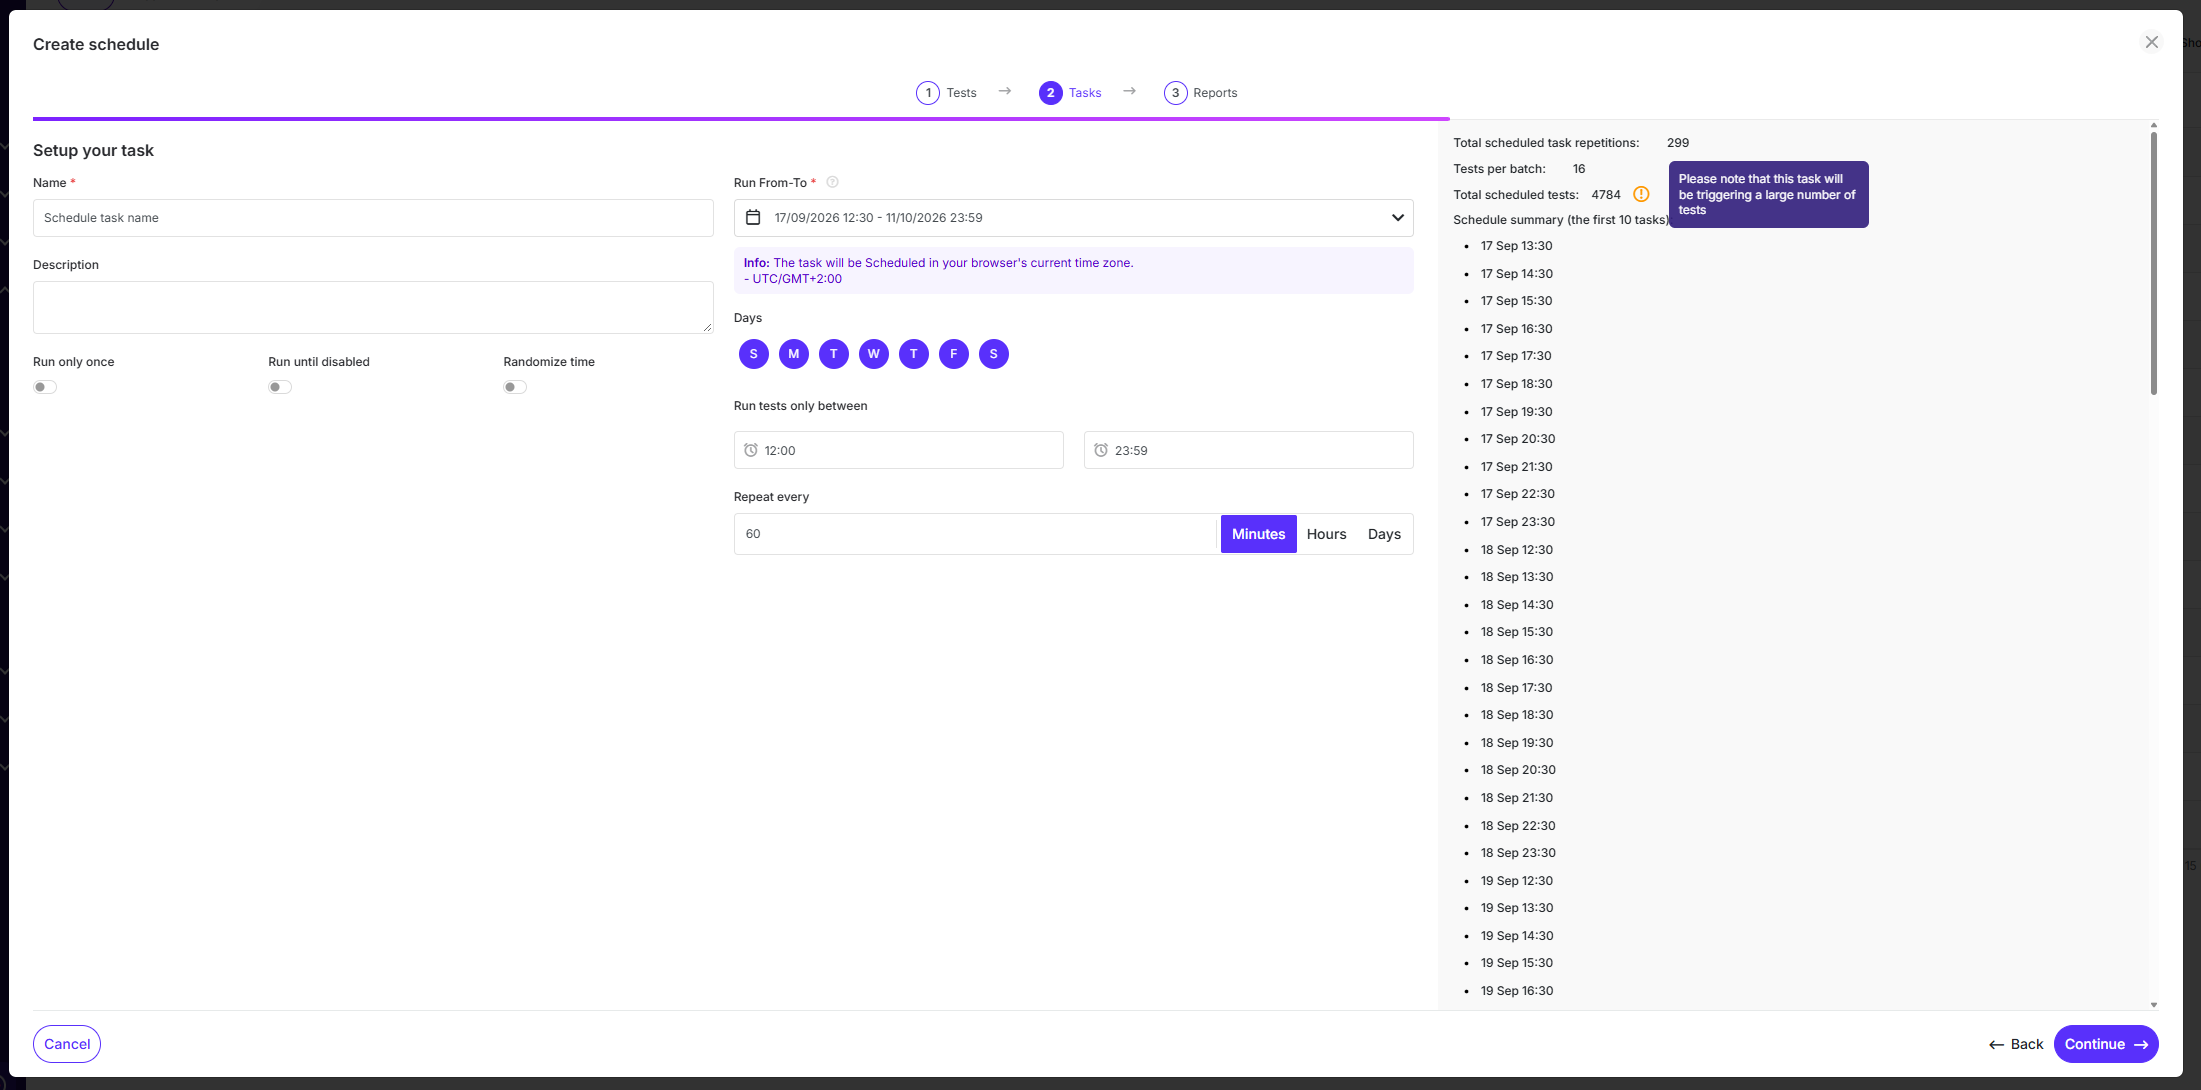
Choose how the task runs:
-
Run only once — send a single batch at the start time, with no repetition
-
Run until disabled — run indefinitely until the task is manually stopped (no finish date)
-
Randomize time — send batches at random times within the run window, so vendors can't recognize your test schedule.
Then set the timing:
-
Run From-To — the start and end date/time. Tasks are scheduled in your browser's time zone; after creation all times are converted to UTC and do not follow summer/winter time changes.
-
Days — the weekdays on which batches run. All days are selected by default; click a day to toggle it.
-
Run tests only between — the daily time window during which batches can be sent.
-
Repeat every — the sending frequency: enter a value and choose Minutes, Hours, or Days.
The panel on the right updates live as you configure:
-
Total scheduled task repetitions — how many batches will run
-
Tests per batch — the batch size from Step 1
-
Total scheduled tests — repetitions × tests per batch. A warning appears here when the total is large.
-
Schedule summary — scheduled run times
Click Continue to proceed.
Step 3 — Reports
Set which results trigger an email alert, and how you're notified.
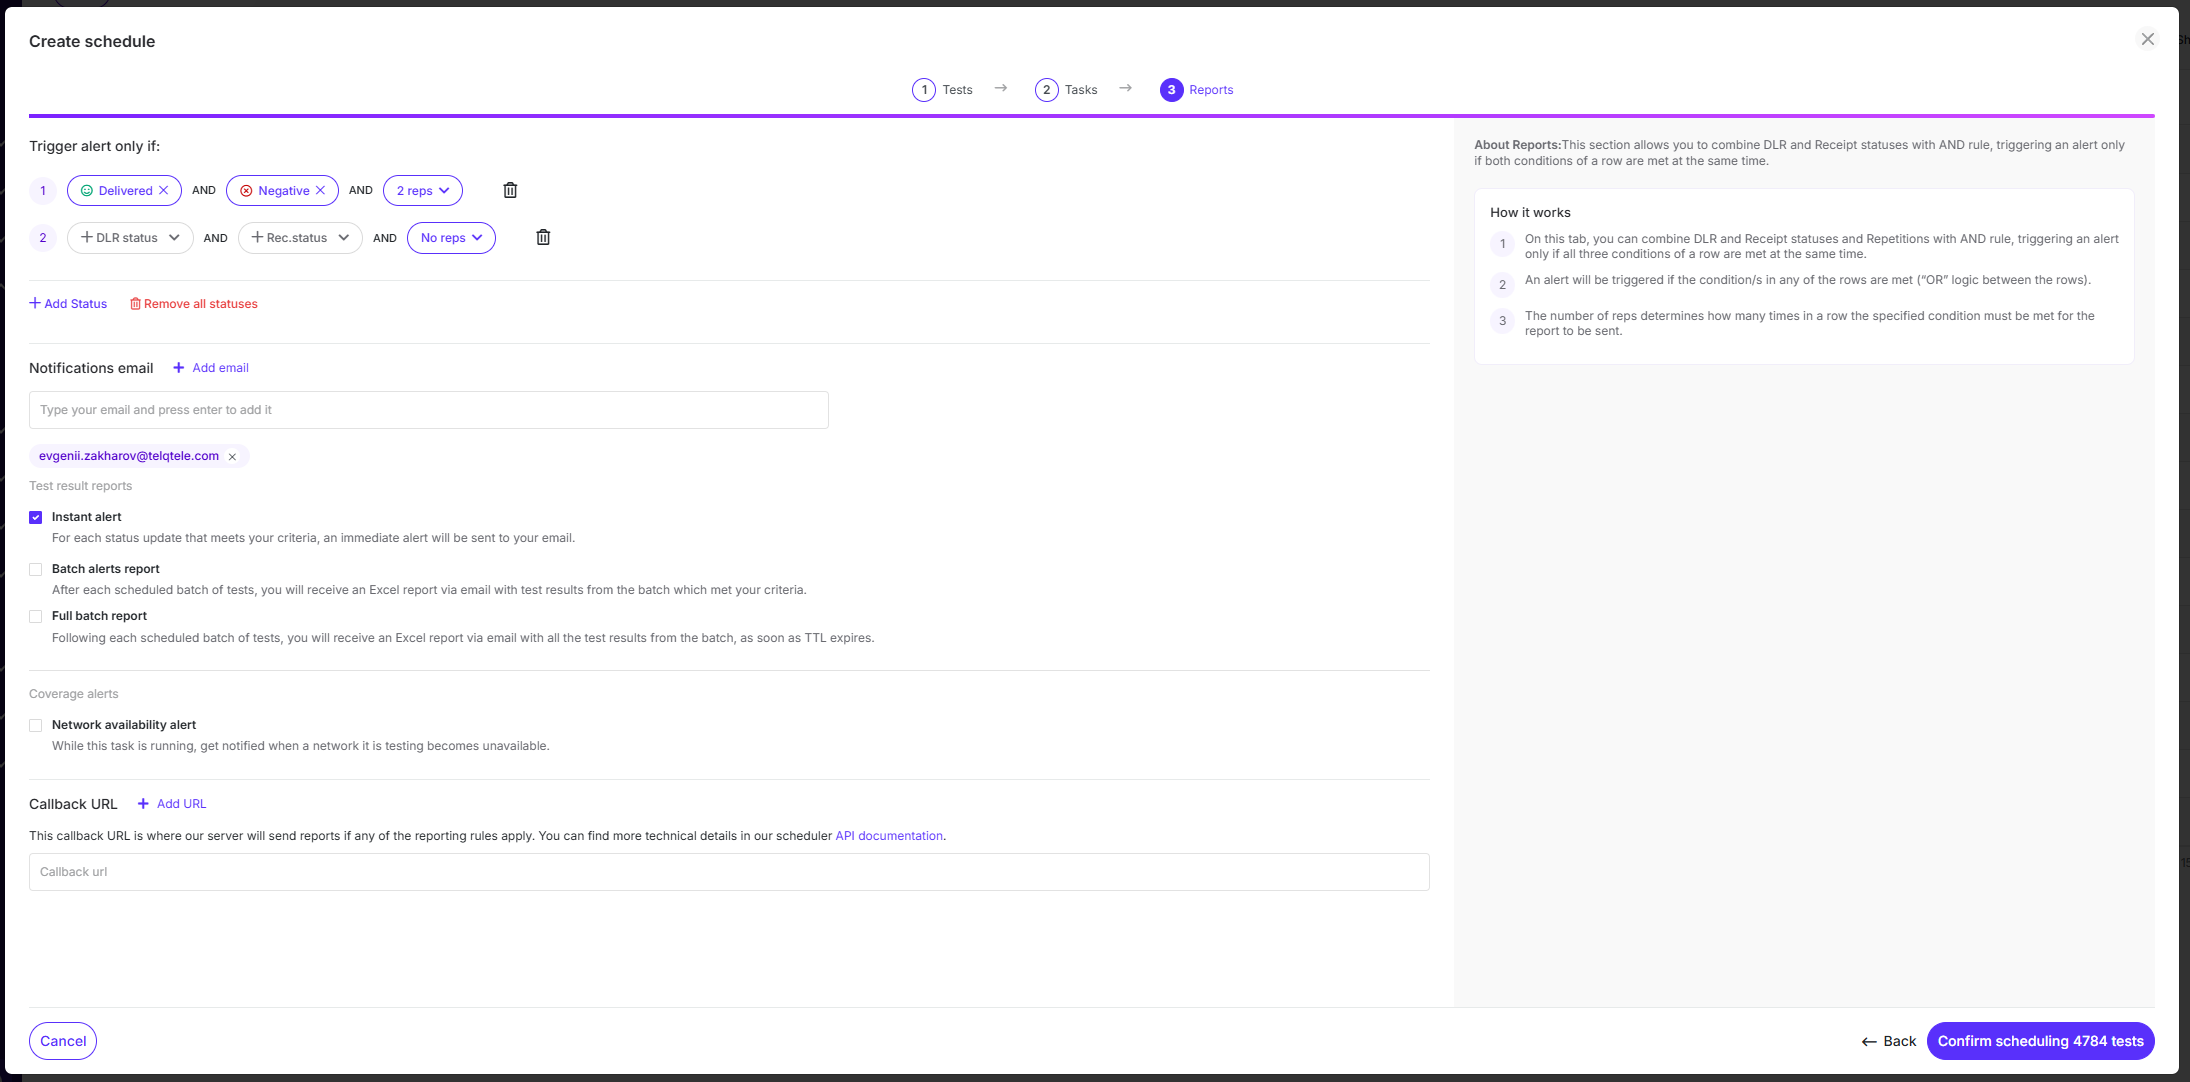
Trigger alert only if
Build one or more condition rows. Within a row, combine a DLR status, a Receipt status, and a number of reps with AND logic — the alert fires only when all conditions in the row are met at the same time. Rows are combined with OR logic — an alert fires if any row matches.
-
Reps — how many times in a row the condition must be met before the report is sent. Use "No reps" to trigger on a single occurrence.
Add Status adds a new row; the bin icon removes a row; Remove all statuses clears them all.
If no conditions are set, no alerts are sent. The tests still run on schedule and their results are available in the task's Results — you just won't receive email notifications for them.
Notifications email
Prefilled with the your account's email. Add or remove addresses as needed (type an address and press Enter). This field can't be empty, you need to have at least one email there.
Test result reports — choose any combination:
-
Instant alert — an immediate email for each status update that meets your criteria set above
-
Batch alerts report — an Excel report emailed after each batch, containing the batch results that met your criteria
-
Full batch report — an Excel report emailed after each batch with all results, sent once the batch's TTL expires
Coverage alerts
-
Network availability alert — get notified while the task is running if a network it tests becomes unavailable
Callback URL
Add a URL to have reports delivered to your SMS platform's gateway in addition to email. A callback URL must be set per task. See the scheduler API documentation for details.
Click Confirm scheduling [N] tests to create the task. You'll return to the Schedules page with the new task Running.
Reports page
The Reports page is a log of every alert triggered by your scheduled tasks — each row is a test result that met the alert conditions set in a task's Reports step. Use it to review your alert history in one place: which tasks reported issues, when, and on which networks.
Filter the log by ID, Date reported, or Schedule name.
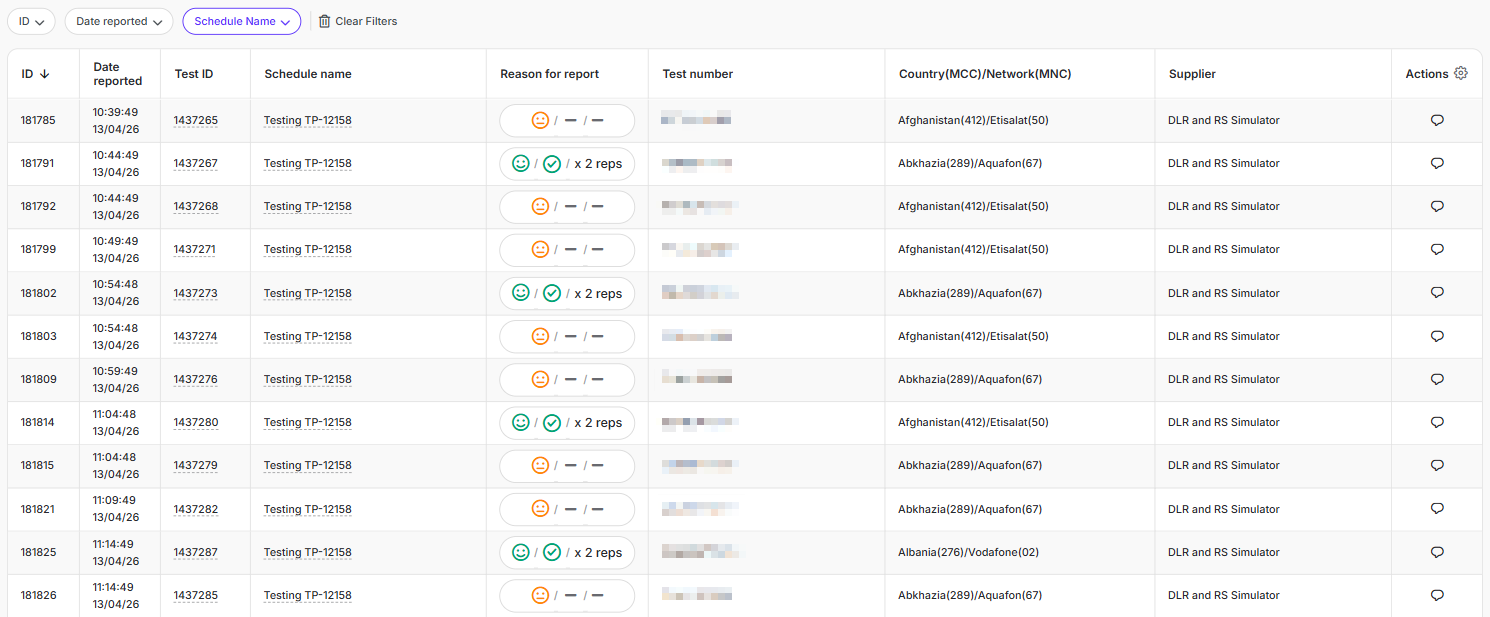
Columns
-
ID — unique ID of the report entry
-
Date reported — when the alert was triggered
-
Test ID — the test that triggered the alert. Click it to open the test
-
Schedule name — the scheduled task that generated the alert. Click it to open the task settings window
-
Reason for report — the condition that triggered the alert, mirroring the row set in the task's Reports step: the matched DLR status, the matched Receipt status, and the number of reps configured for that condition (e.g. "x 2 reps")
-
Test number — the test number the message was sent to
-
Country(MCC)/Network(MNC) — the destination network
-
Supplier — the route the test was sent through
-
Actions — open the comment icon to view or add a comment on the test
Use the gear icon in the Actions header to choose which columns are shown.