
Overview
SIP CLI Testing allows you to verify the caller ID presentation of your SIP calls by initiating a test call from TelQ UI -> to your SIP server -> to your vendor -> to a TelQ test number. This testing helps ensure your SIP-based calls deliver the expected CLI (Calling Line Identification) across various networks.
Before initiating a SIP CLI test, you need to configure the connection between your SIP server and the TelQ platform.
Once configured, you can execute and monitor SIP CLI tests to analyze test results and ensure CLI correctness.
Configure Your SIP Server
In order for the platform to successfully establish a connection with your SIP server, you must whitelist our IP address on your SIP system:
IP to whitelist: 52.29.63.229
Failure to do so will result in the SIP configuration showing as Offline, even if all other parameters are correctly set.
To begin, navigate to the SIP Configuration page under Integration Settings. Click the Add Config button to open the configuration modal.
SIP Configuration Fields

-
Name: An identifier for your SIP configuration. Helps distinguish between multiple trunks you have.
-
Protocol: Select the protocol used by your SIP server (currently only UDP protocol is supported).
-
Host: The IP address or domain name of your SIP server.
-
Port: The port on which your SIP server is listening (e.g., 5060).
-
Username (Optional): A SIP authentication username used to register or authenticate when sending calls through this trunk.
Use this field if your SIP provider requires credential-based authentication instead of, or alongside, IP whitelisting. -
Password (Optional): The corresponding password for the SIP authentication username.
Required if your provider uses credential authentication to secure SIP trunk access. -
Prefix: A string that is automatically prepended to the destination number (the number being dialed) when a test call is sent through this SIP trunk.
-
When to use it: Some SIP providers rely on tech prefixes to determine the correct internal routing path for a call. These prefixes are typically numeric but may include special characters (e.g.,
025#,*999). The SIP provider uses this prefix to select a route, then strips it before forwarding the call to the intended destination. -
This field is optional. Leave it empty if your SIP provider does not require a destination prefix.
-
Special characters such as
#,*or+are supported, but ensure your provider accepts them. -
The prefix is used only in the signaling to your SIP server - it is not shown in the results table.
-
Only one prefix can be applied to SIP configuration.
-
-
Throughput in Calls per Second (CPS): The rate at which your SIP server can send calls.
-
SIP OPTIONS ping is a lightweight SIP message used to periodically check the availability of a SIP endpoint (your SIP trunk). It allows our platform to detect whether your SIP server is reachable and responsive before sending test calls.
This feature is enabled by default and we recommend keeping this feature enabled, as it helps ensure call attempts are only made when the endpoint is online.
However, you may choose to disable OPTIONS ping if:
-
You already have your own monitoring or failover mechanism in place.
-
Your infrastructure does not support OPTIONS responses.
-
You want to reduce signaling traffic to minimize load or noise on your SIP server.
Note: If OPTIONS is disabled, the platform may not detect unreachable trunks in advance, which could result in failed test attempts.
-
-
Enabled: A toggle to activate or deactivate the configuration.
-
If enabled, the SIP trunk will become available for use in SIP CLI tests.
-
If disabled, the configuration will be saved but hidden from test execution until re-enabled.
-
Please ensure that CPS is aligned between your SIP server and our platform to avoid congestion or call rejection.
After saving the configuration, the system attempts to verify connectivity with your SIP server. Once saved, your SIP configuration will appear in the list and be available as SIP trunk for selection during SIP CLI tests.
It may take up to 60 seconds for the connection to go online after initial configuration or edits.

Creating a CLI test
Navigate to the SIP CLI Testing page to configure a test and start testing. In order to send a test you have to:
1. Enter the Caller ID.
Enter the Caller ID (CLI) that your SIP server will use when initiating the call.
The CLI must match a number that your SIP server is authorized to use. If it does not match, the call may be rejected or fail CLI verification.
2. Select the destination(s) that you wish to test.
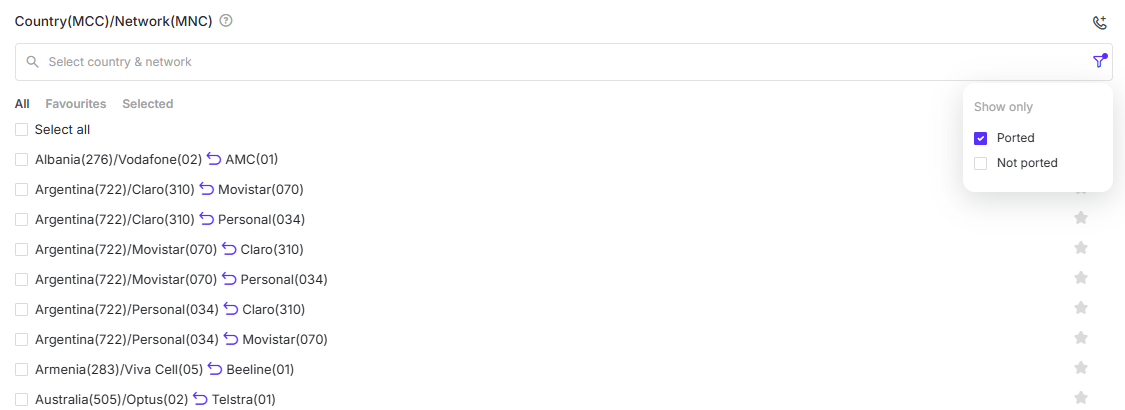
Destinations: In this list, you may find all the destinations for which we have available test numbers at the time, representing our current coverage. Please note that this list will constantly update throughout the day to account for networks being added and removed from the coverage.
If you need to filter out only the ported or non-ported numbers, you can click on the funnel icon and filter by selecting the corresponding checkbox:
If testing multiple destinations, ensure the total number of calls aligns with your configured CPS limit to avoid throttling or dropped calls.
3. Select the SIP Trunk.
Choose the SIP server you previously configured. All SIP configurations saved on the SIP Configuration page will appear here as SIP Trunks. You can select only one SIP Trunk at a time.
Only SIP configs which are online will be selectable, while those that are offline will be displayed but not selectable.
4. Initiate test.
Click the Run button. The platform will assign our test numbers for each selected destination, and await calls from your SIP server.
Test Execution & Behavior
-
Once the test is created, the system waits for the incoming call from your SIP server to the assigned test number.
-
The call will be automatically declined by our test number after CLI is captured, and results are populated in the results table.
Results in SIP CLI Testing
All the tests that you issue will be visible in the Results section.
Between the Test Creation and Test Results sections, you will find the Filters section which you can use to search or filter for specific tests. You can add the filters you need by clicking on the + Add Filter button. Below are columns explanation:
|
Column |
Description |
|---|---|
|
ID |
A unique identifier assigned to each test request. This ID helps you track, reference, and troubleshoot individual tests in the system. |
|
Date |
Date and time of the test request. Please note that the timestamp in html is always in the browser’s time zone. |
|
UTC Date |
The precise timestamp when the test request was initiated, displayed in Coordinated Universal Time (UTC). Using UTC ensures that the timing is standardized, regardless of the browser’s local time zone. |
|
Country/Network |
The destination you selected for testing. |
|
SIP Status / Rec Status |
SIP Status: The last received SIP status code and message from your server. Hover to see full status.
|
|
CLI |
Displays the Caller ID that was sent and the Caller ID that was delivered. In case the delivered one was modified, we highlight it and the show the original Caller ID value in hover-over tooltip. Clicking on the Caller ID you will be able to see more detailed information. Color coding to interpretate the result:
|
|
SIP CLI |
The CLI that your SIP server sent when initiating the call. |
|
Phone |
The test number assigned to your request. |
|
Delay |
This column indicates the delay in delivery for the Receipt status. The Receipt delay is the delay between when the test was created and when our system received the information from the test number that the call was received. |
|
User |
User who initiated the test. |
|
Price |
Cost of the test per destination. |
|
SIP Trunk |
The SIP trunk (from your configuration) used to place the call. |
Receipt Statuses explanation:
-
Wait: The test is awaiting the SIP call to be received.
-
Received: The call has been delivered to the destination and was processed by our system. In the test details, you will see the number the call was sent to, as well as the caller ID and the receipt time from the moment the test was created.
-
Caller ID Replaced: The call has been delivered to our test number with the Caller ID modified.
-
Expired: The call has failed to be received within its TTL. No further call attempts should be made. This status will appear if our test number didn’t detect the receipt of the call within the TTL.
-
Internal Error - Our systems have suffered an internal error and your test could not be completed.
Please contact TelQ Support if this happens.
You will not be billed for this test. -
Test number offline - We were not able to confirm the receipt of the test call within the TTL and the test number was unavailable when the TTL expired.
You will not be billed for this test. -
Network Offline - The network for which this test was issued was offline when the test was created.
You will not be billed for this test.