
Account settings
The Account Settings section allows you to view and manage configuration options for your TelQ account and your organization. Depending on your role, you can modify your own profile, manage team members, or adjust company-wide settings.
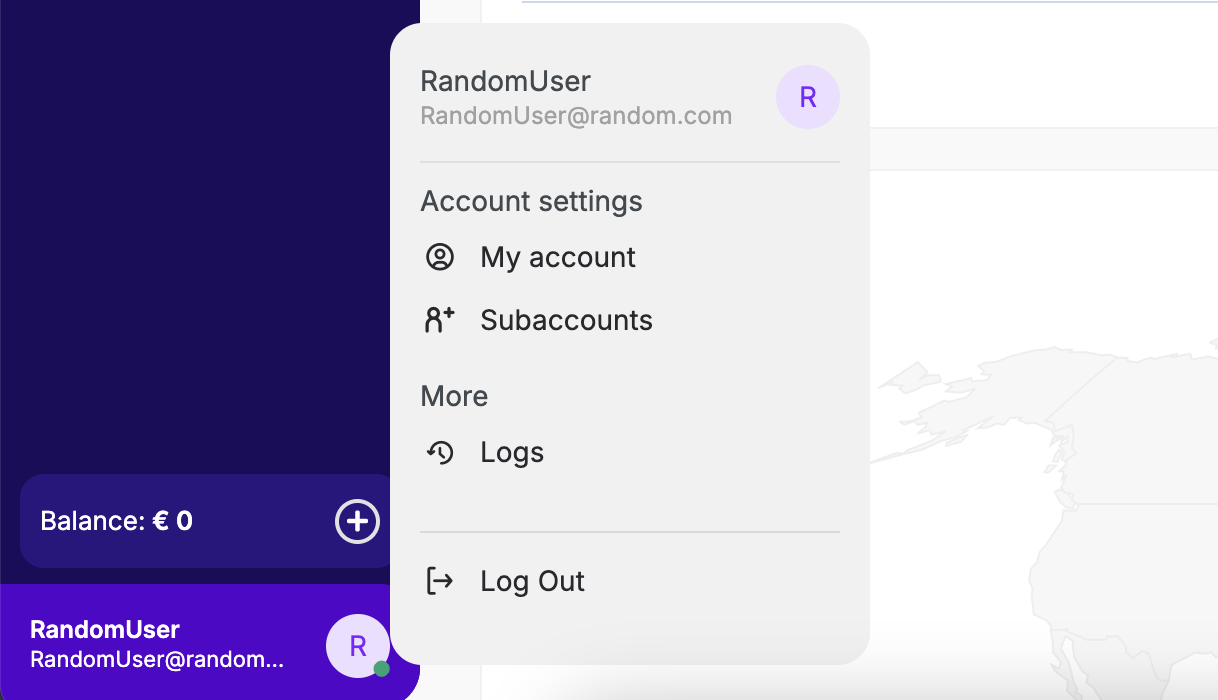
You can access Account Settings from the bottom-left corner of the TelQ interface by hovering over your account name. A menu will appear with options that vary depending on your account type.
Account Type | Accessible Menus |
|---|---|
Main (Admin) | My Account, Subaccounts, Logs |
Deputy | My Account, Subaccounts, Logs |
Subaccount | My Account only |
Each organization can have only one main account and up to 500 active subaccounts and deputy accounts combined.
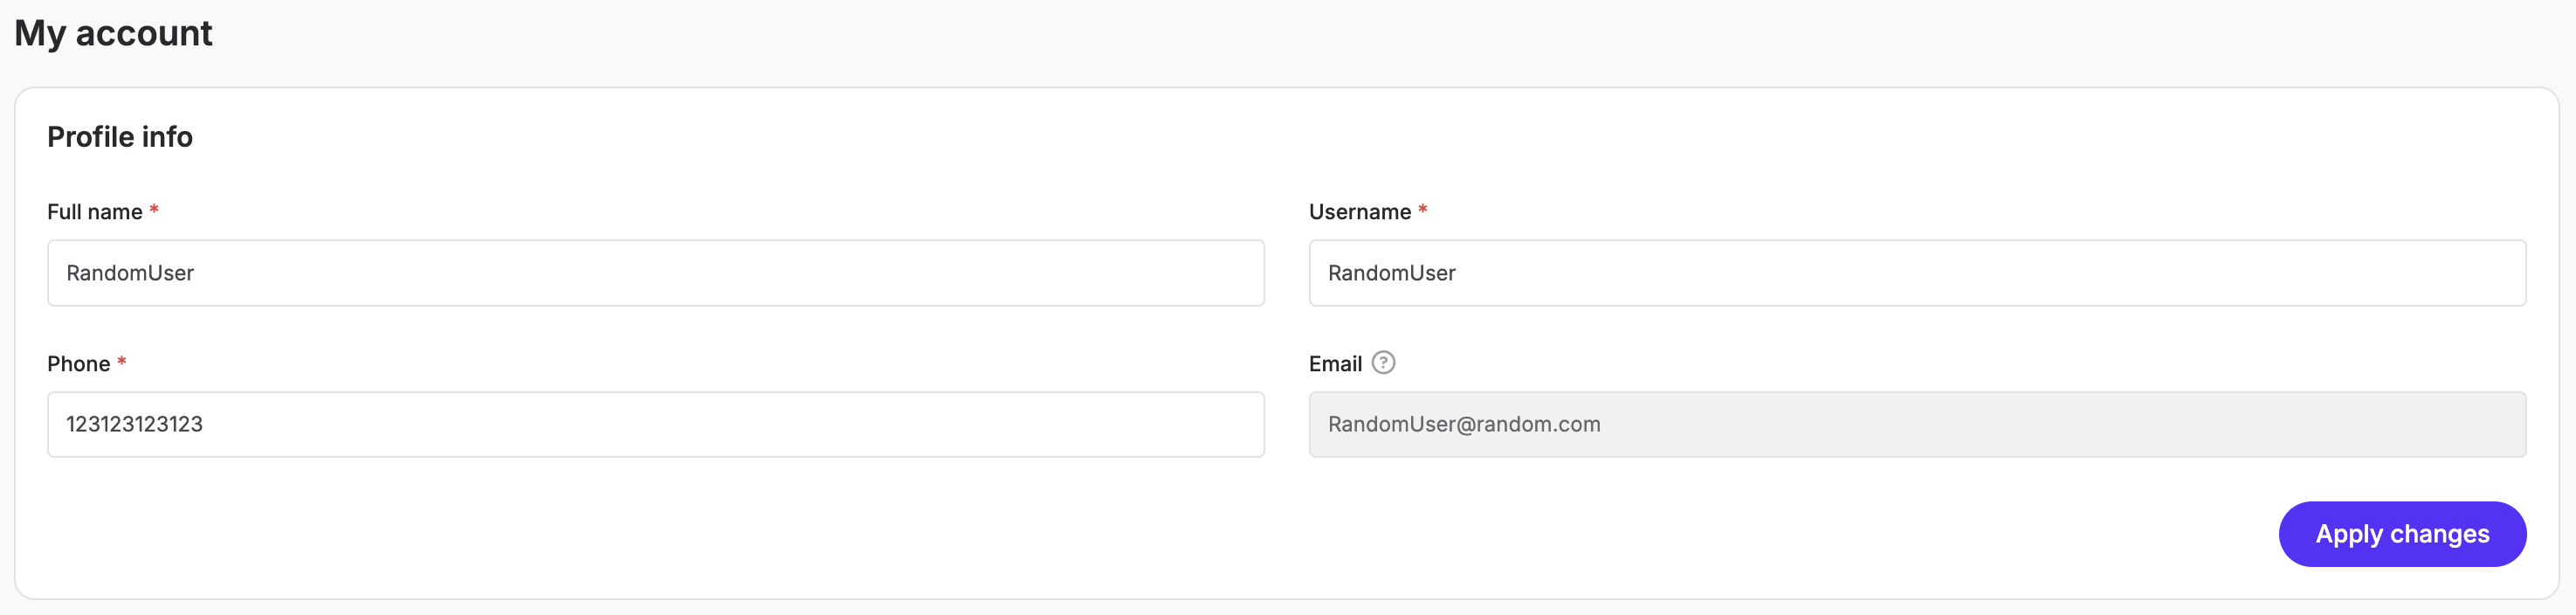
My Account
The My Account menu allows you to view and edit personal and organizational information depending on your user role. Both main and deputy accounts have full access to company and platform settings, while subaccounts have limited editing rights for their own profile only.
Subaccount View
Subaccounts can access and edit only their personal profile information. They do not have access to edit company details or platform settings.
Editable fields:
Full name
Username
Phone number
The Email field is view-only. To change it, contact TelQ Support.
Main and Deputy Account View
Main and deputy accounts have access to extended sections under My Account, including Company Details and Platform Settings.
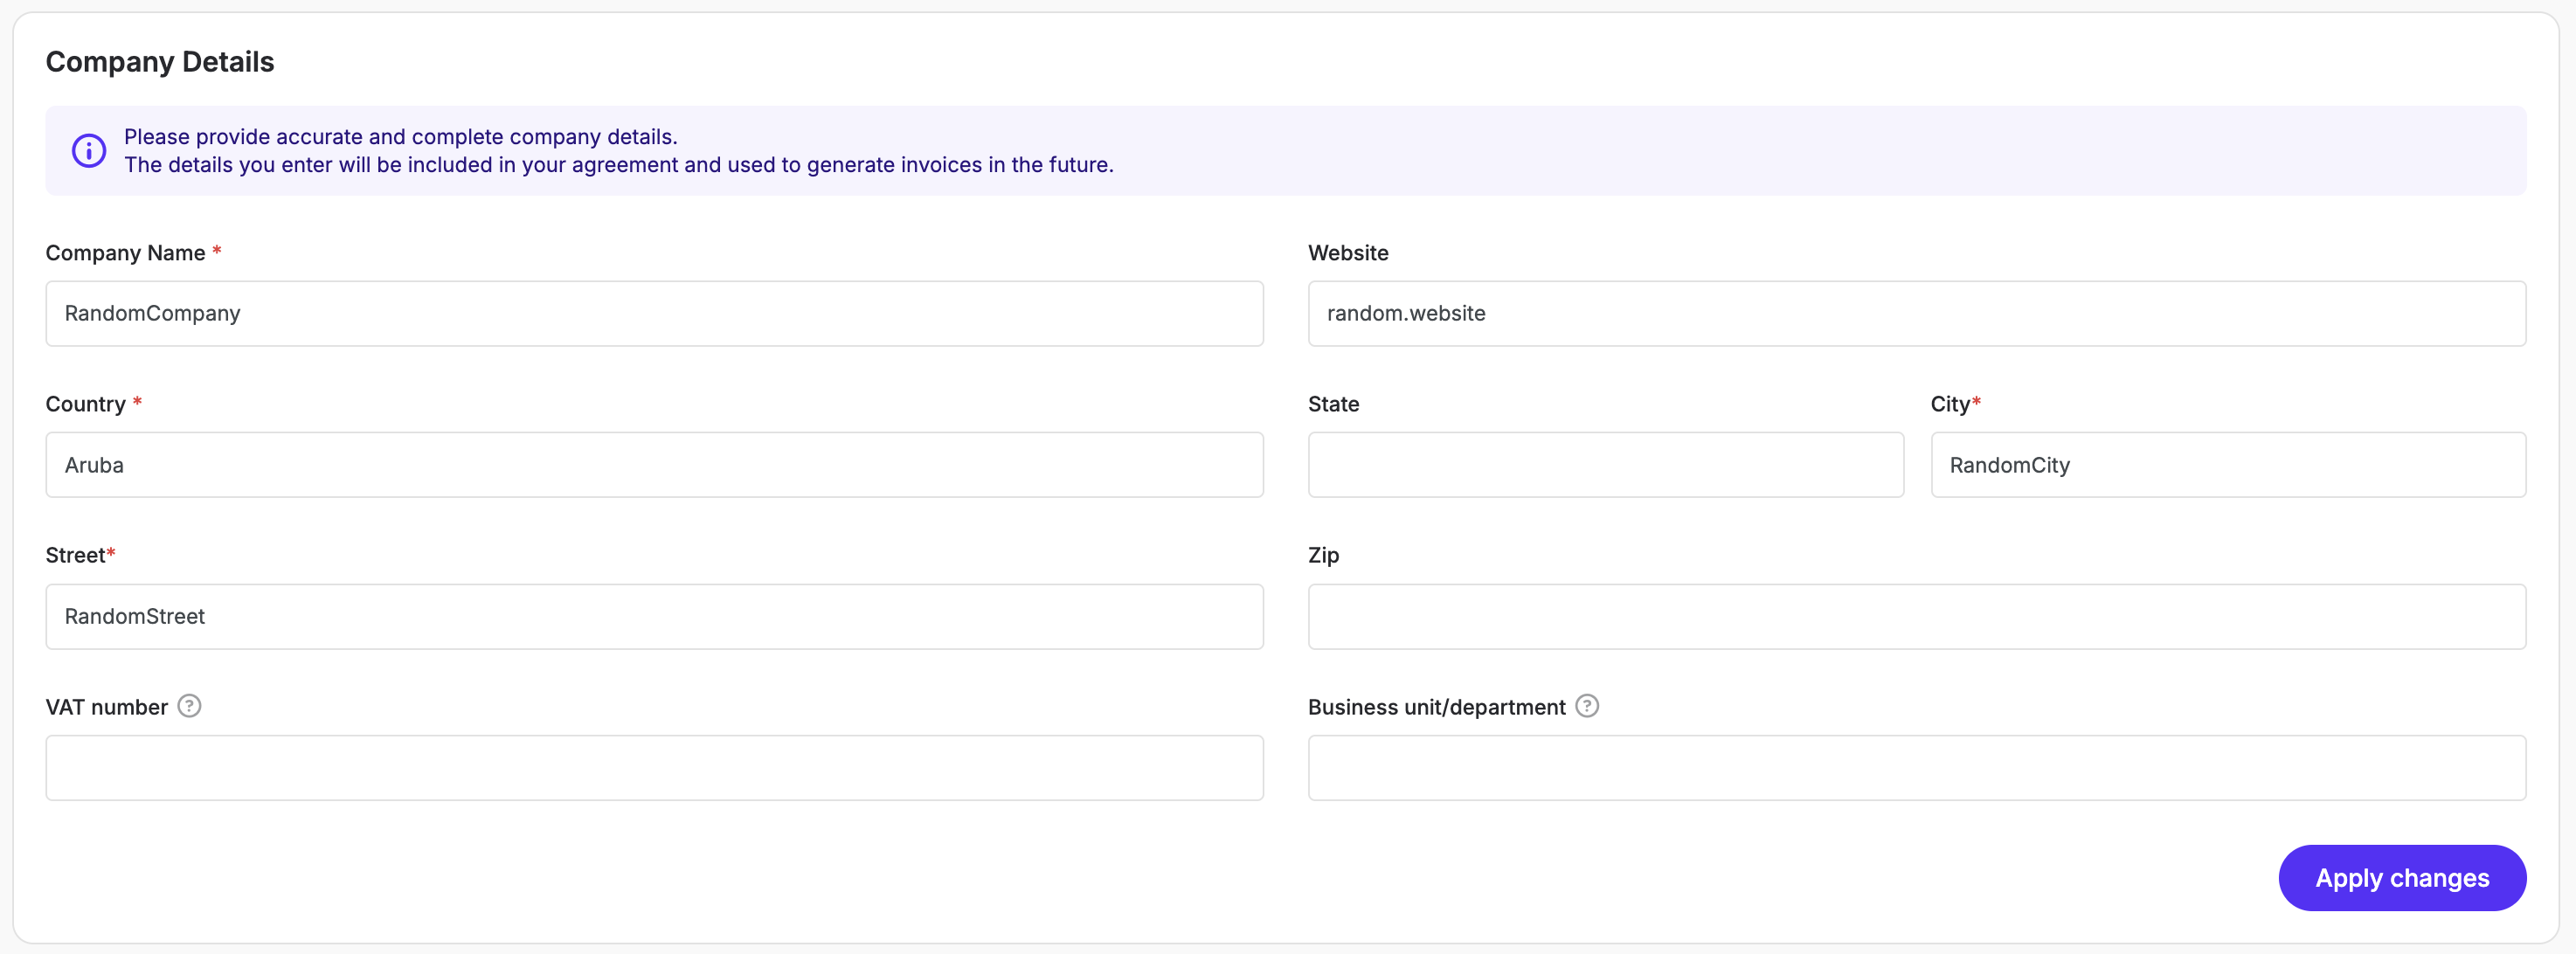
Company Details
This section holds your organization’s official information, used for agreements and invoice generation.
Editable fields include:
Company Name
Website
Country, State, City, Street, and ZIP
VAT Number
Business Unit / Department
Please ensure all company information is accurate and complete, as it will appear on official invoices and contracts.
Platform Settings
Located below the Company Details section, Platform Settings allow you to control account-level configurations that affect all subaccounts in your organization.
Setting | Description |
|---|---|
Invoices Email | Email address where billing and invoice notifications are sent. |
Default SMS TTL | Time-to-live value determines how long (in minutes) the system will wait for a final receipt status for test SMS before considering it as a negative. Default value applies to all related accounts but can be changed in Settings of LNT test. |
Backup Tests | Enable this option to have our platform issue a back-up test any time a number becomes temporary unavailable. A clone of your test will be sent to a different number of the same MCCMNC free of charge. |
TTL and Backup Test settings are global defaults for all accounts unless overridden in specific test configurations.
Security & Login
The Security & Login section is available to all account types. It provides tools to strengthen your account’s protection through two-factor authentication, device management, and - for main accounts - IP whitelisting.
To ensure account safety, TelQ requires email-based One-Time Password (OTP) verification by default. This step is mandatory for all users and provides protection against unauthorized logins.
Mobile Authenticator App (2FA)
Enable 2FA to add a second layer of security through a mobile authentication app.
To enable:
Click Enable beside Mobile Authenticator App.
Follow the setup instructions using an authenticator app (e.g., Google Authenticator, Authy).
Enabling 2FA is strongly recommended for all users.
Password Management
Click Change password to update your credentials securely. You’ll receive a confirmation email including the time and date of the password change. If you didn’t request it, contact TelQ Support immediately.
Use a strong, unique password that includes uppercase letters, lowercase letters, numbers, and symbols.
Connected Devices
Click Connected devices to review where your account has been accessed.
You’ll see:
Device type or browser
Last login time
Recorded IP address
Once a month, you’ll be asked to verify your trusted devices via an email OTP to maintain security.
IP Whitelisting (Main Accounts Only)
Main accounts have access to IP Whitelisting, allowing you to restrict logins and test executions to specific IP addresses. Only users connecting from the specified IPs will be able to trigger tests on the platform. This feature is especially useful for maintaining security in large organizations or distributed teams.
IP Whitelisting applies organization-wide. Once enabled, it affects all deputy and subaccounts.
Logout
Select Logout to safely end your session. Always log out from shared computers or devices when not in use.
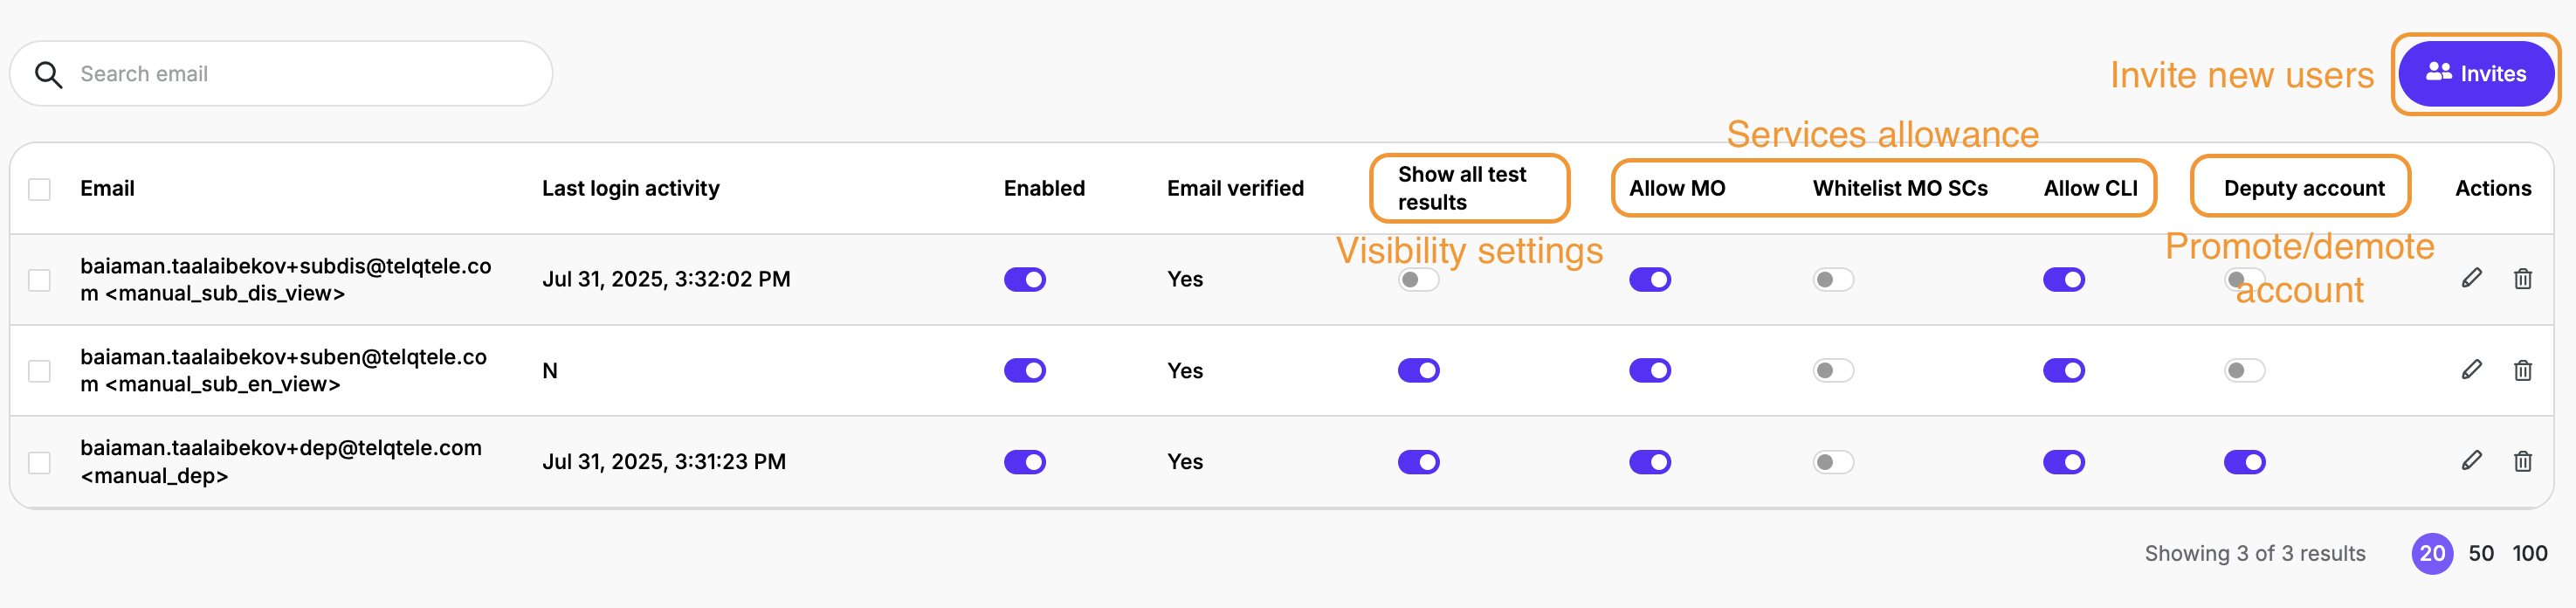
Subaccounts
The Subaccounts menu (visible to main and deputy accounts) lets you manage your organization’s users, including subaccounts and deputy accounts.
Viewing and Managing Accounts
You can view all registered subaccounts and deputy accounts, along with their permissions and activity statuses.
Each user row includes several action buttons:
Action | Description |
|---|---|
Enable / Disable Account | Temporarily deactivate or reactivate an account. |
Restrict Visibility | Control whether a subaccount can view only its own tests or all company-wide data. |
Enable / Disable Service | Control whether a subaccount can use certain services like MO or CLI. |
Enable / Disable Whitelist MO Shortcodes (SCs) | Control whether a subaccount can whitelist MO shortcodes (e.g. 3030, 9010 etc). |
Promote / Demote | Promote a subaccount to a deputy or revert a deputy to subaccount. |
Edit / Delete | Edit details or permanently delete a subaccount. Deleted accounts cannot be reactivated. |
Deputy accounts always have full visibility across the organization. This permission cannot be restricted.
Inviting New Users
To invite a new team member:
Click Invites at the top of the Subaccounts page.
Enter the new user’s email address.
Click Send to issue the invitation.
The invitation remains valid for 7 days. Once accepted, the new subaccount will appear in your Subaccounts list. Pending invites display their status as well.
Logs
The Logs section allows you to track and review all activity within your TelQ account — from login events to test submissions and API actions. It is available to main and deputy accounts for organization-wide monitoring.
Overview
In the Logs menu, you can view detailed entries of every action performed in your organization’s account. Each log entry includes:
Column | Description |
|---|---|
Time | Date and time when the action occurred. |
User | The user who performed the action. |
Resource | The endpoint or resource accessed (e.g., |
Device | Browser or client used for the action, including IP or user agent. |
Service | The specific area of the platform where the event took place (e.g., User, Live Testing). |
You can filter logs by:
Date range
Specific user
Test group ID or resource
Device or IP
This makes it easy to locate specific actions or analyze account behavior over time.
Exporting Logs
You can export your logs in Excel format (.xlsx) for external review or reporting.
To export:
Click the Download icon in the top-right corner of the Logs view.
Choose the number of entries to export (e.g., 1000 or All).
Click Export to download the file.