
Interpreting test results
All the tests that you issue will be visible in the Results section, at the bottom of Live number testing.
Columns and explanations
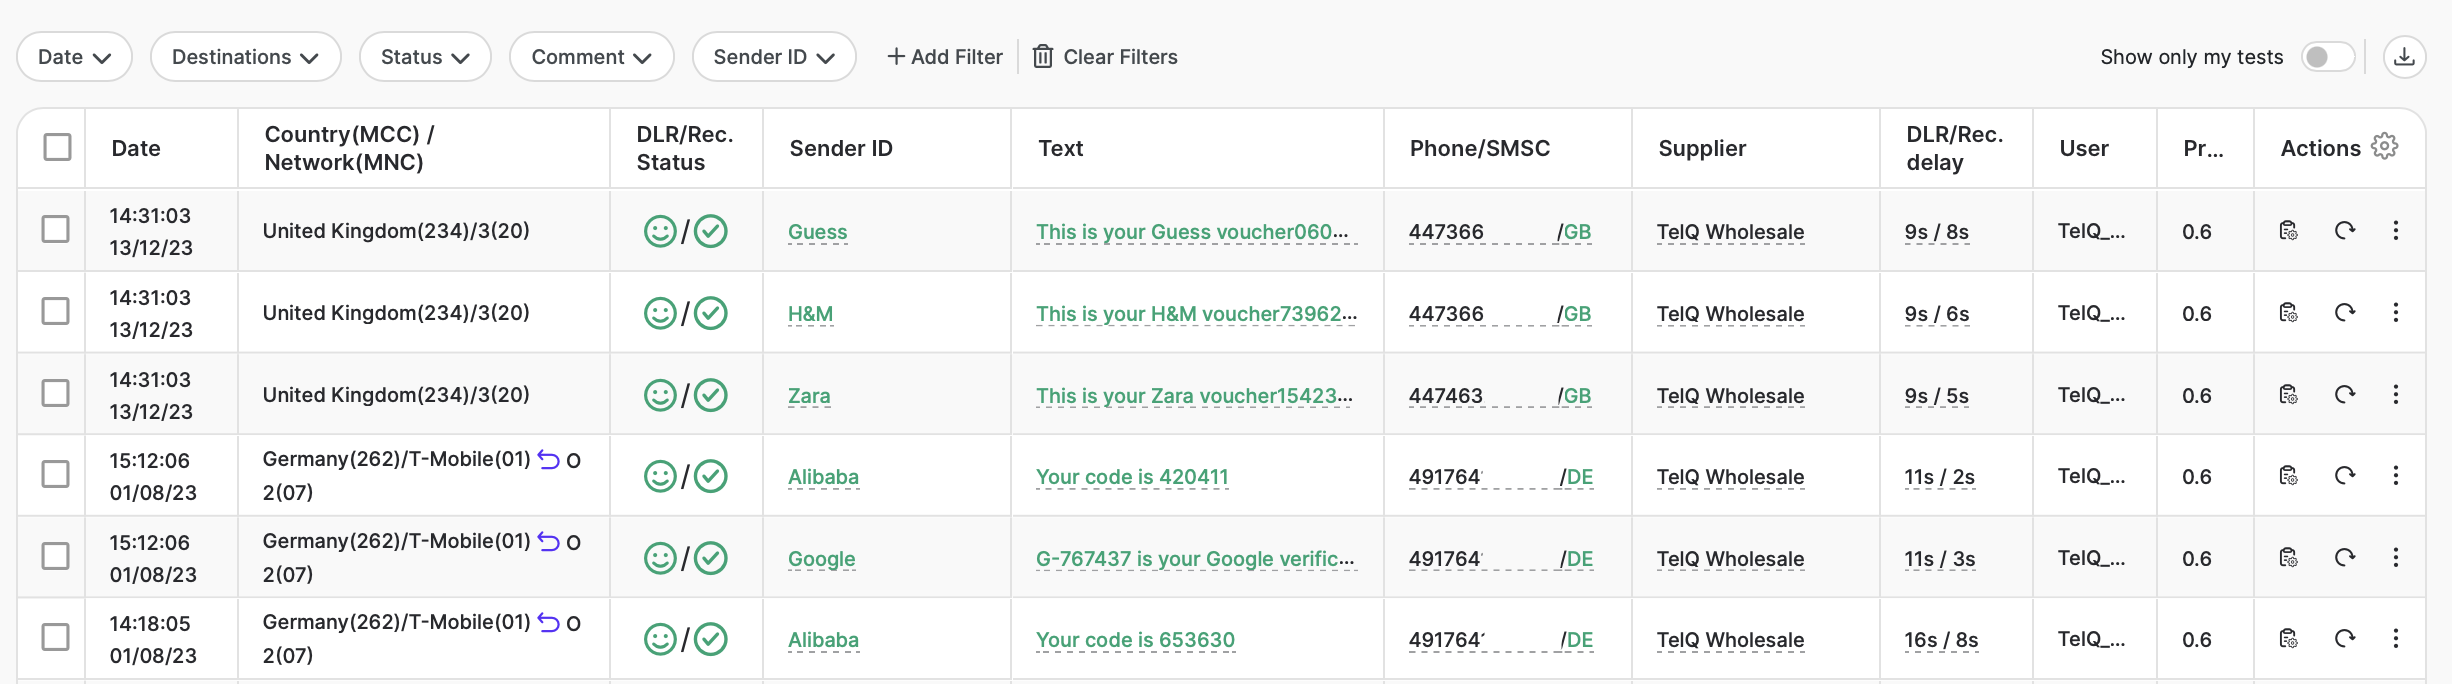
Date
Date and time of the test request being issued (more accurately, date and time when the Test ID Text was issued for your test request). Please note that the timestamp in html is always the browser’s timezone.
Country(MCC)/Network(MNC)
The destination you selected for testing
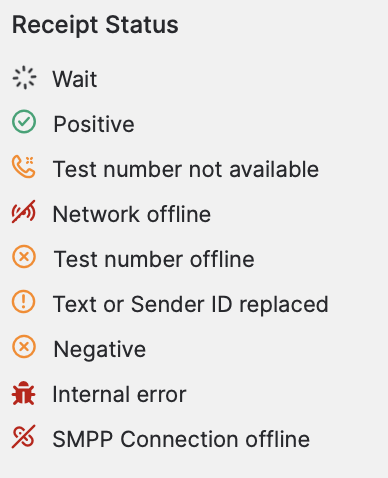
DLR/Rec. status: This column has 2 important values which we will explain below:
► DLR: represents the delivery report that you receive from your supplier and you forward to us in order to be processed. In some specific cases, we return an “internal” DLR status (No DLR received, Partially delivered, submit_sm failed). More details on the Icon status of the DLRs can be found clicking on the question mark (?) at the bottom right, then clicking on Help, as well as by hovering with the mouse over the icon in Results:
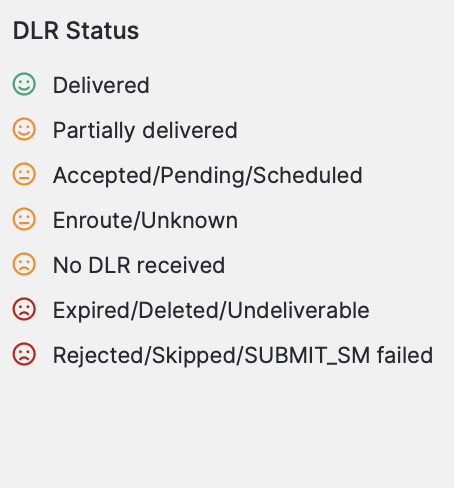
► Rec. status: represents the Receipt status which is the answer given by our test number to your test request. More details on the Icon status of the Receipt Status can be found clicking on the question mark (?) at the bottom right, then clicking on Help, as well as by hovering with the mouse over the icon in Results:
Realtime Updates:
Our Results section updates in real time, which means that intermediary DLR and Receipt statuses such as Pending, Wait, Test number not available, etc. will turn to final ones as soon as our platform receives feedback from our handset.
Please note that ‘Test number not available’ is a temporary status. We update our test numbers’ availability constantly and in rare cases it’s possible that the test number selected for your test will no longer be available in which case we will disable it if it does not communicate with our system for 4 minutes. Therefore, you will receive ‘Test number not available’ as Receipt status. It is a temporary status, which means that our system will wait for the test number to come back online during the TTL value (the validity time of the Test ID Text).

You may find the TTL feature in Settings (the gear icon at the top right ) in Live number testing or in Account settings, where you can update how long you would like to wait for the final receipt status. The minimum TTL is 1 min, however, we recommend you to set it to at least 10 mins, to account for the possibility of the test number not being available as mentioned above.
If there is any alternative and available test number for the same MCC MNC at that moment, a back-up test will be issued, if enabled (you may change the setting by modifying the value of “Back-up tests” from My account. More information on this can be found in Back-up tests.)
If our test number does not come back online during the TTL value, the Receipt status will change to ‘Test number offline’. If no back-up test was issued, we will return the credit consumed for this test back to your balance. (The credit will also be returned if the back-up test’s Receipt status is “Test number offline” too).
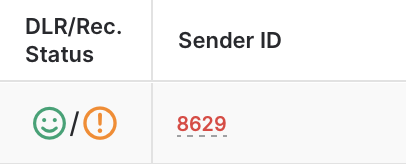
Fake DLR
You may spot a Fake DLR when the values in the DLR/Rec. status column looks like this:

As you can see in the screenshot, the DLR report sent by your supplier confirms that the SMS was delivered, but the Receipt status sent by our test number is saying that the SMS did not reach the handset.
Please note that escalation of our test numbers to your vendors in case of Fake DLR is strictly forbidden. By escalating our test number to your suppliers, you will only announce the quality testing to your vendors and they will whitelist the test number. This will make it useless for your own purpose of performing quality testing on their routes and useless for us as we will have to replace our test numbers more frequently, and therefore drive a price increase of our services.
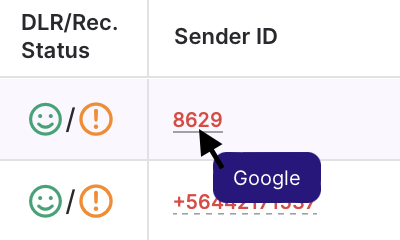
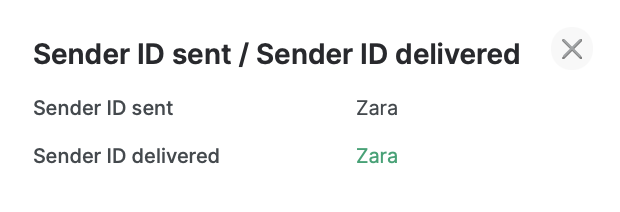
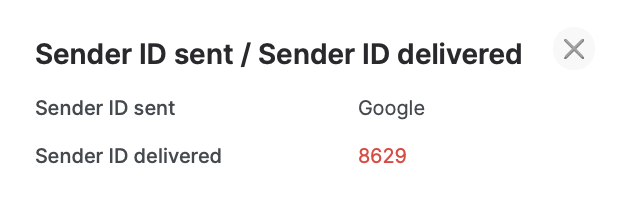
Sender ID
In Live Number Testing, we display the Sender ID that was sent and the Sender ID that was delivered. In case the delivered one was modified, we highlight the SID value in purple:
The displayed value is:
black if the test did not reach our test number
green if the test reached our test number and the Sender ID submitted was identical to the Sender ID received
and it’s red if the test reached our test number but the Sender ID received by our test number was different from the Sender ID submitted.
Clicking on the Sender ID you will be able to see more information about the modification.
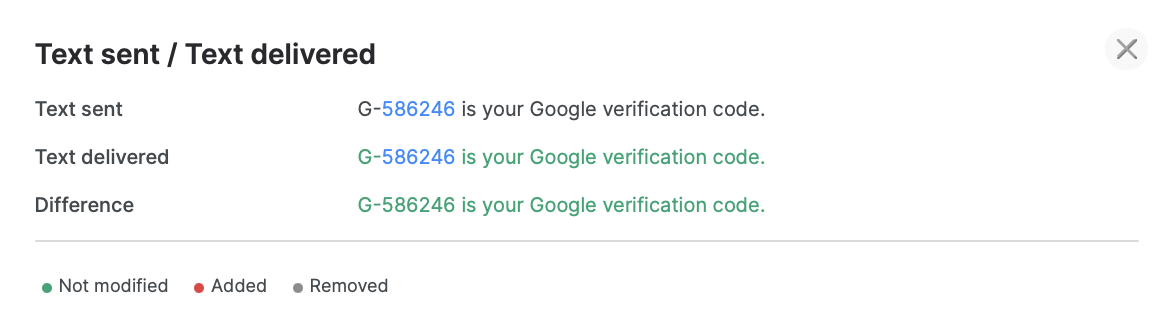
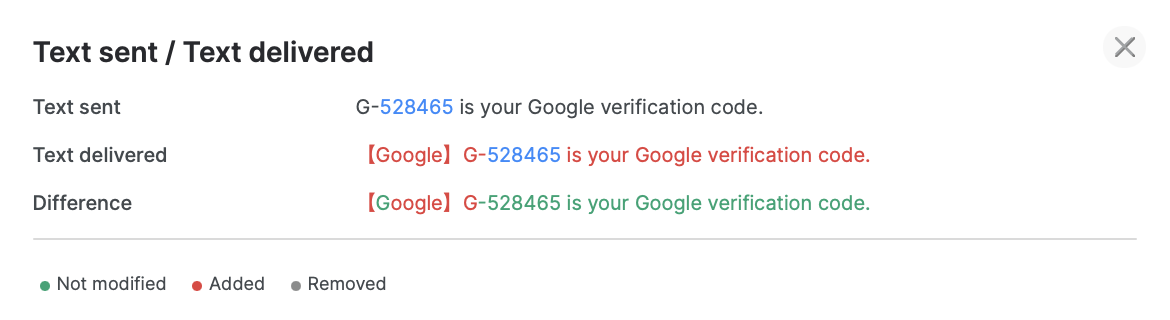
Text: The displayed value is:
black if the test did not reach our test number,
green if the test reached our test number and the text submitted was identical to the text received
and it’s red if the test reached our test number but the text received by our test number is different from the text submitted.
Please feel free to click on the value in this column to see more information:
Phone: In this column you can see the test number allocated to your test request.
SMSC: In case the test was received by our test number, in this column you will see the SMSC that delivered the message. Please note that the SMSC information is provided by the mobile network operator and in case the MNO did not provide this information when delivering the message, we cannot retrieve the SMSC info and therefore it will not be displayed.
The SMSC value will be:
green if the SMSC country code matches the country code of the destination tested,
red if it does not match.
If you click on the value in SMSC column you will be able to get more information:
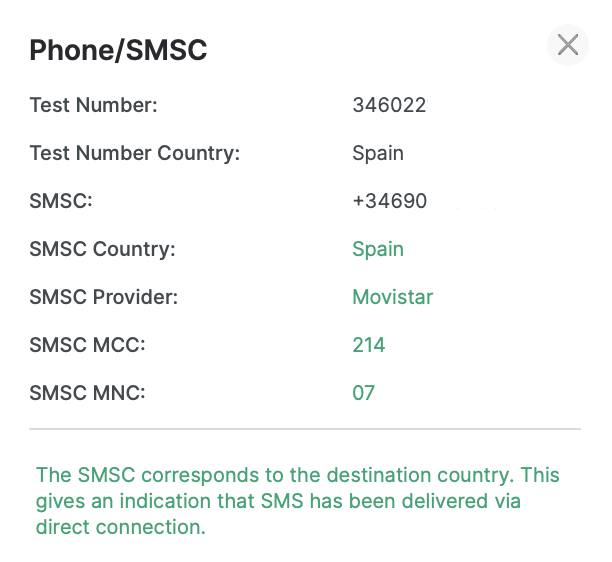
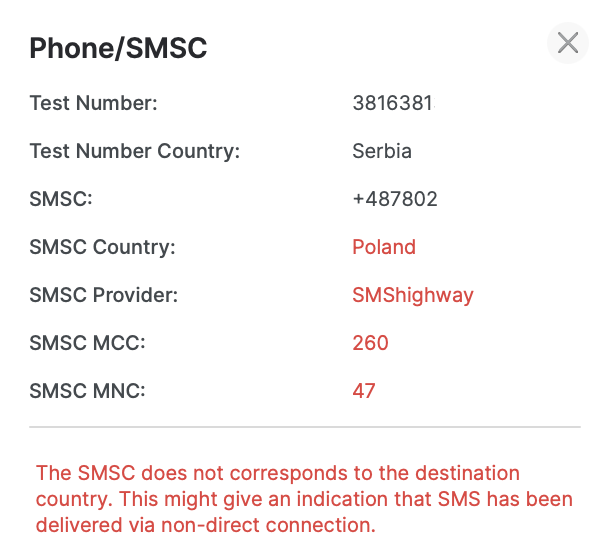
If the test is successfully received by our test number and the SMSC value is shared by the MNO in the PDU, we automatically and free of charge run an HLR query on it in order to retrieve more information about it: MCC, MNC and provider for that particular SMSC value.
This information should assist you in detecting if your vendor is using a direct route or to identify the SMSC owner.
Supplier: This column indicates the supplier chosen for the test.
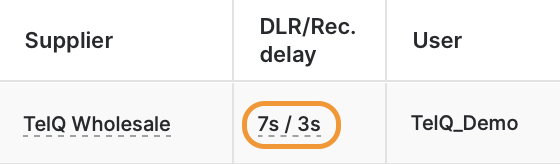
DLR/Rec. delay: This column indicates the values of the delay in getting the SMPP DLR status and the delay in delivery for the Receipt status. The Receipt delay is the delay between when the test was created and when our system received the information from the test number that the message was delivered. The values in this column are interactive and you can check the SMPP Latency Details by clicking on them:
For each timestamp, we also present the time interval between each other. This is what the bar colors in the chart represent:
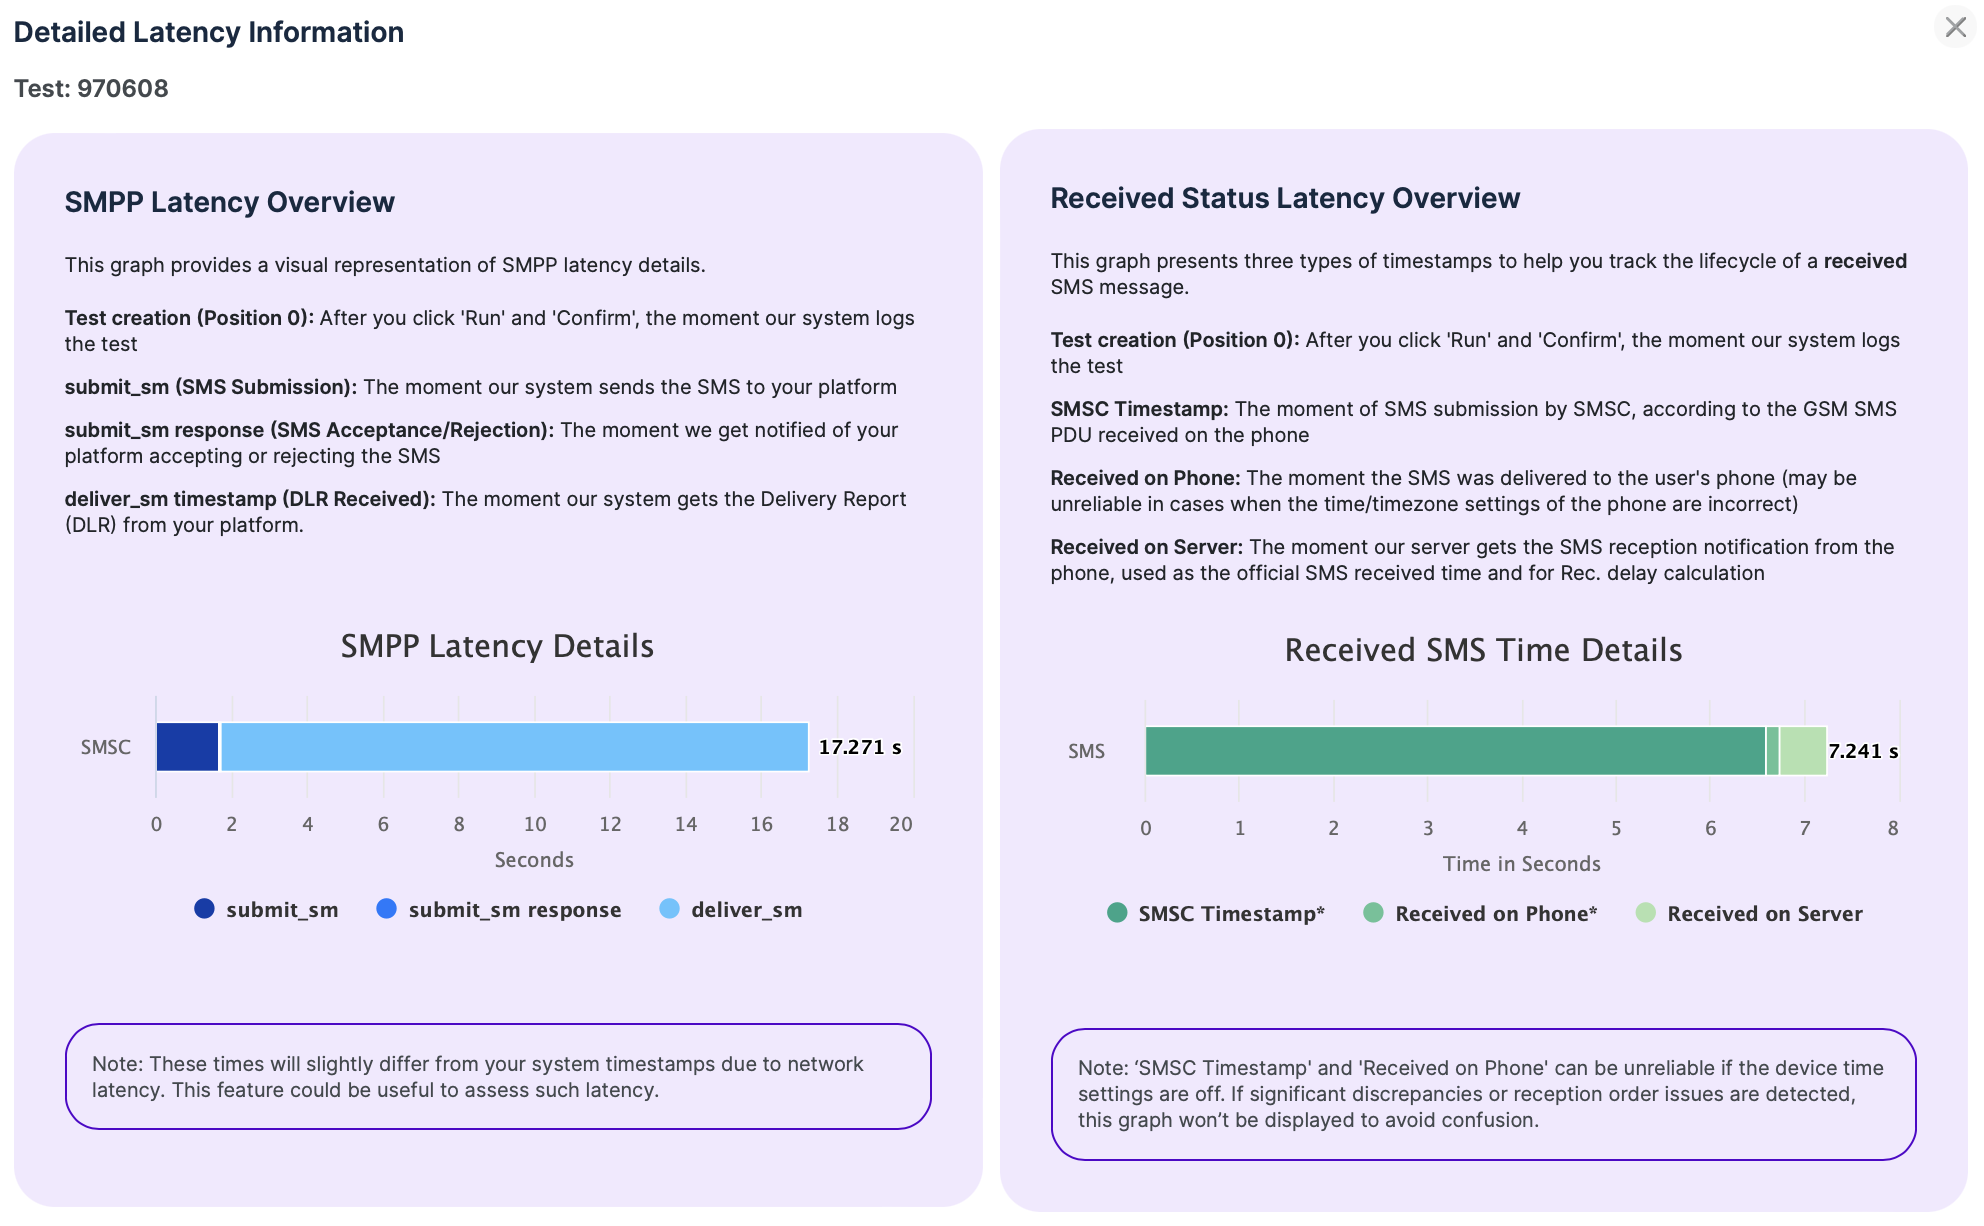
Currently we provide you with 3 different timestamps from our SMPP System for DLR delays. Here is a short explanation of the blue color bar:
Position 0 in the chart - test creation - the timestamp when our backend system saved the Test information to our database, after you clicked Run and Confirm on our web app.
submit_sm - SMS submitted to your SMS platform - timestamp captures the instant when our SMPP System scheduled the submit_sm PDU through the SMPP Session.
submit_sm response - SMS accepted/rejected by your SMS platform - timestamp captures the moment when our SMPP System gets notified of the submit_sm_response PDU arriving.
deliver_sm timestamp - DLR received from your SMS platform - captures the instant when our SMPP System receives the deliver_sm PDU.
Please note that these timestamps will also naturally differ a bit from your system timestamps, since depending on the location, load and bandwidth of your systems with respect to ours, there will inevitably exist a certain amount of network latency. This new feature could be useful to assess such latency.
We provide 3 different timestamps regarding SMS reception. Here is a short explanation of the green color bar:
Position 0 in the chart - test creation - the timestamp when our backend system saved the Test information to our database, after you clicked Run and Confirm on our web app.
SMSC Timestamp* - Indicates the smsc submission timestamp, contained on the GSM SMS PDU received on the phone.
Received on Phone* - Marks the instant the SMS was delivered to the user (mobile app). This value could be unreliable in some rare cases when the time/timezone settings of the phone are incorrect.
Received on Server - The moment when our backend server receives the notification of SMS reception from the mobile phone. This is the only timestamp we can guarantee as correct so it’s the one used officially for SMS Received timestamp, as well as for calculating the Rec. Delay of a test.
It is important to note that SMSC Timestamp and Received on Phone can be affected by incorrect time and timezone settings on the SMSC or mobile phone, and as such TelQ can’t guarantee its precision in 100% of cases. If we detect the delays are off by more than 15 minutes or if they don’t match the expected order of reception (For example, it should always be first SMSC timestamp, second phone timestamp, and last server timestamp) then we don’t display the graph for it, since an error on the time / timezone settings of the remote devices might exist and the values would be unreliable.
User: In this column you will see the user that created the test.
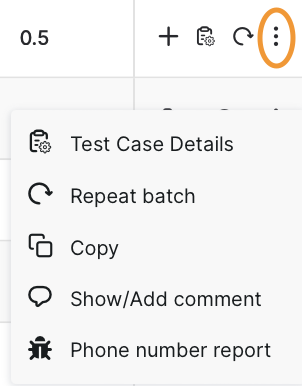
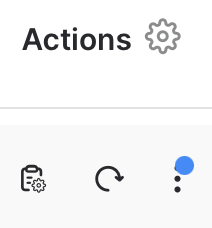
Actions: From the action buttons in this column, you will be able to view backup tests (+) button, view test case, repeat batch, copy test ID, show/add comments and report the test number. Test case details and repeat batch are easily accessible in this column while clicking on the three dots will open more options as shown below:
The “test case details” will open a pop-up which displays all the details of your test. An example of it can be found in the screenshot below:
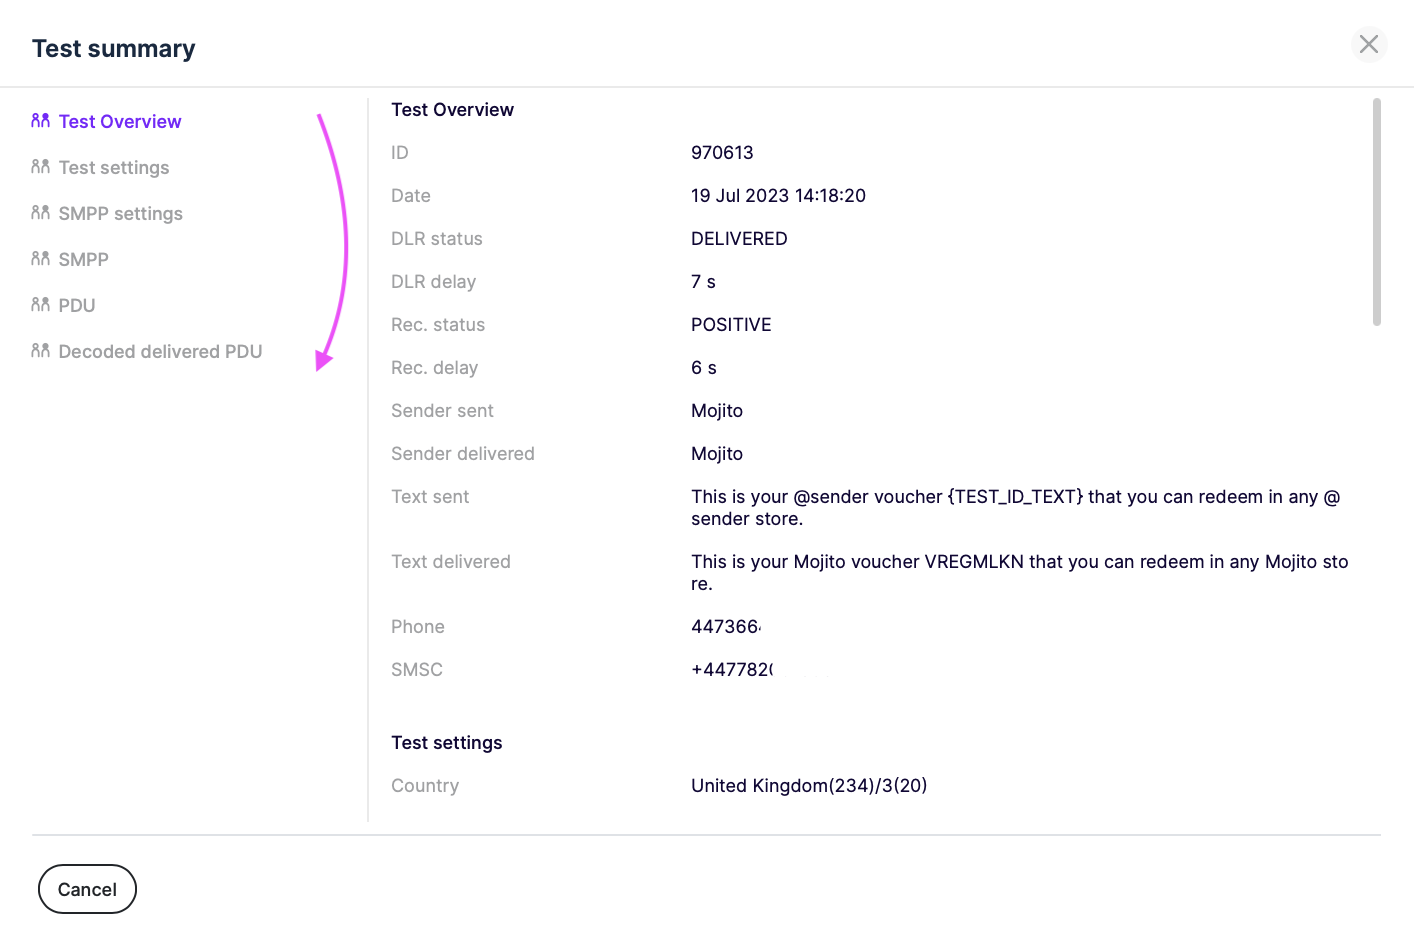
As you can see in the screenshot, in this section you may find more details about your test.
Results table information (detailed explanations above):
ID: A unique number given to each test - it helps our Support team access and debug your tests.
Date: The value that is present in the 1st column of Results table.
Country: The value that is present in the 2nd column of Results table.
Receipt Status: The interpretation of the graphical representation of Rec. Status in the 4th column of Results table.
Receipt delay: The value that is present in the 9th column of Results table for Rec. Status.
Sender ID sent: The Sender ID submitted for the test.
Sender delivered: The Sender ID received by our test number for the test.
Text sent: The text submitted for the test.
Text delivered: The text received by our test number for the test.
Test ID text type: the type of Test ID Text you selected in the Test ID Text Settings.
Test ID text length: the number of characters you selected in the Test ID Text Settings.
SMSC: The value that is present in the 7th column of Results table as SMSC.
Phone: The test number allocated to your test request.
Supplier: The supplier you chose for your test request.
Settings information (the values you set up in Settings):
Protocol ID
Source TON
Source NPI
Data Coding
TTL
SMPP PACKET #1: There will be 1 SMPP Packet displayed for each SMS. This means that if you submit a concatenated message as a test request, you will have 1 SMPP Packet for each SMS.
Status: The DLR status
Message ID: This value is the answer that your platform sends to us upon acknowledgment that the test issued from our platform has been successfully accepted by your platform. A missing Message ID indicates that the test did not reach your platform/ was not accepted by your platform.
Sent at: Timestamp of submitting the test request
Delivered at: Timestamp of receipt (retrieved from our test number)
PDU: The value that we retrieve from our test number in case the receipt of the test request was successful (the test was successfully received by our test number), as well as the decoded version of it.
“Repeat group” will populate the content(s), destination(s), supplier(s) and settings of your initial test batch for which you selected this option. Please keep in mind that by pressing this button, the repeat of the tests will not be done automatically; you will still have to press Run and Confirm in order to repeat the test batch. You will be able to edit the entries before running it.
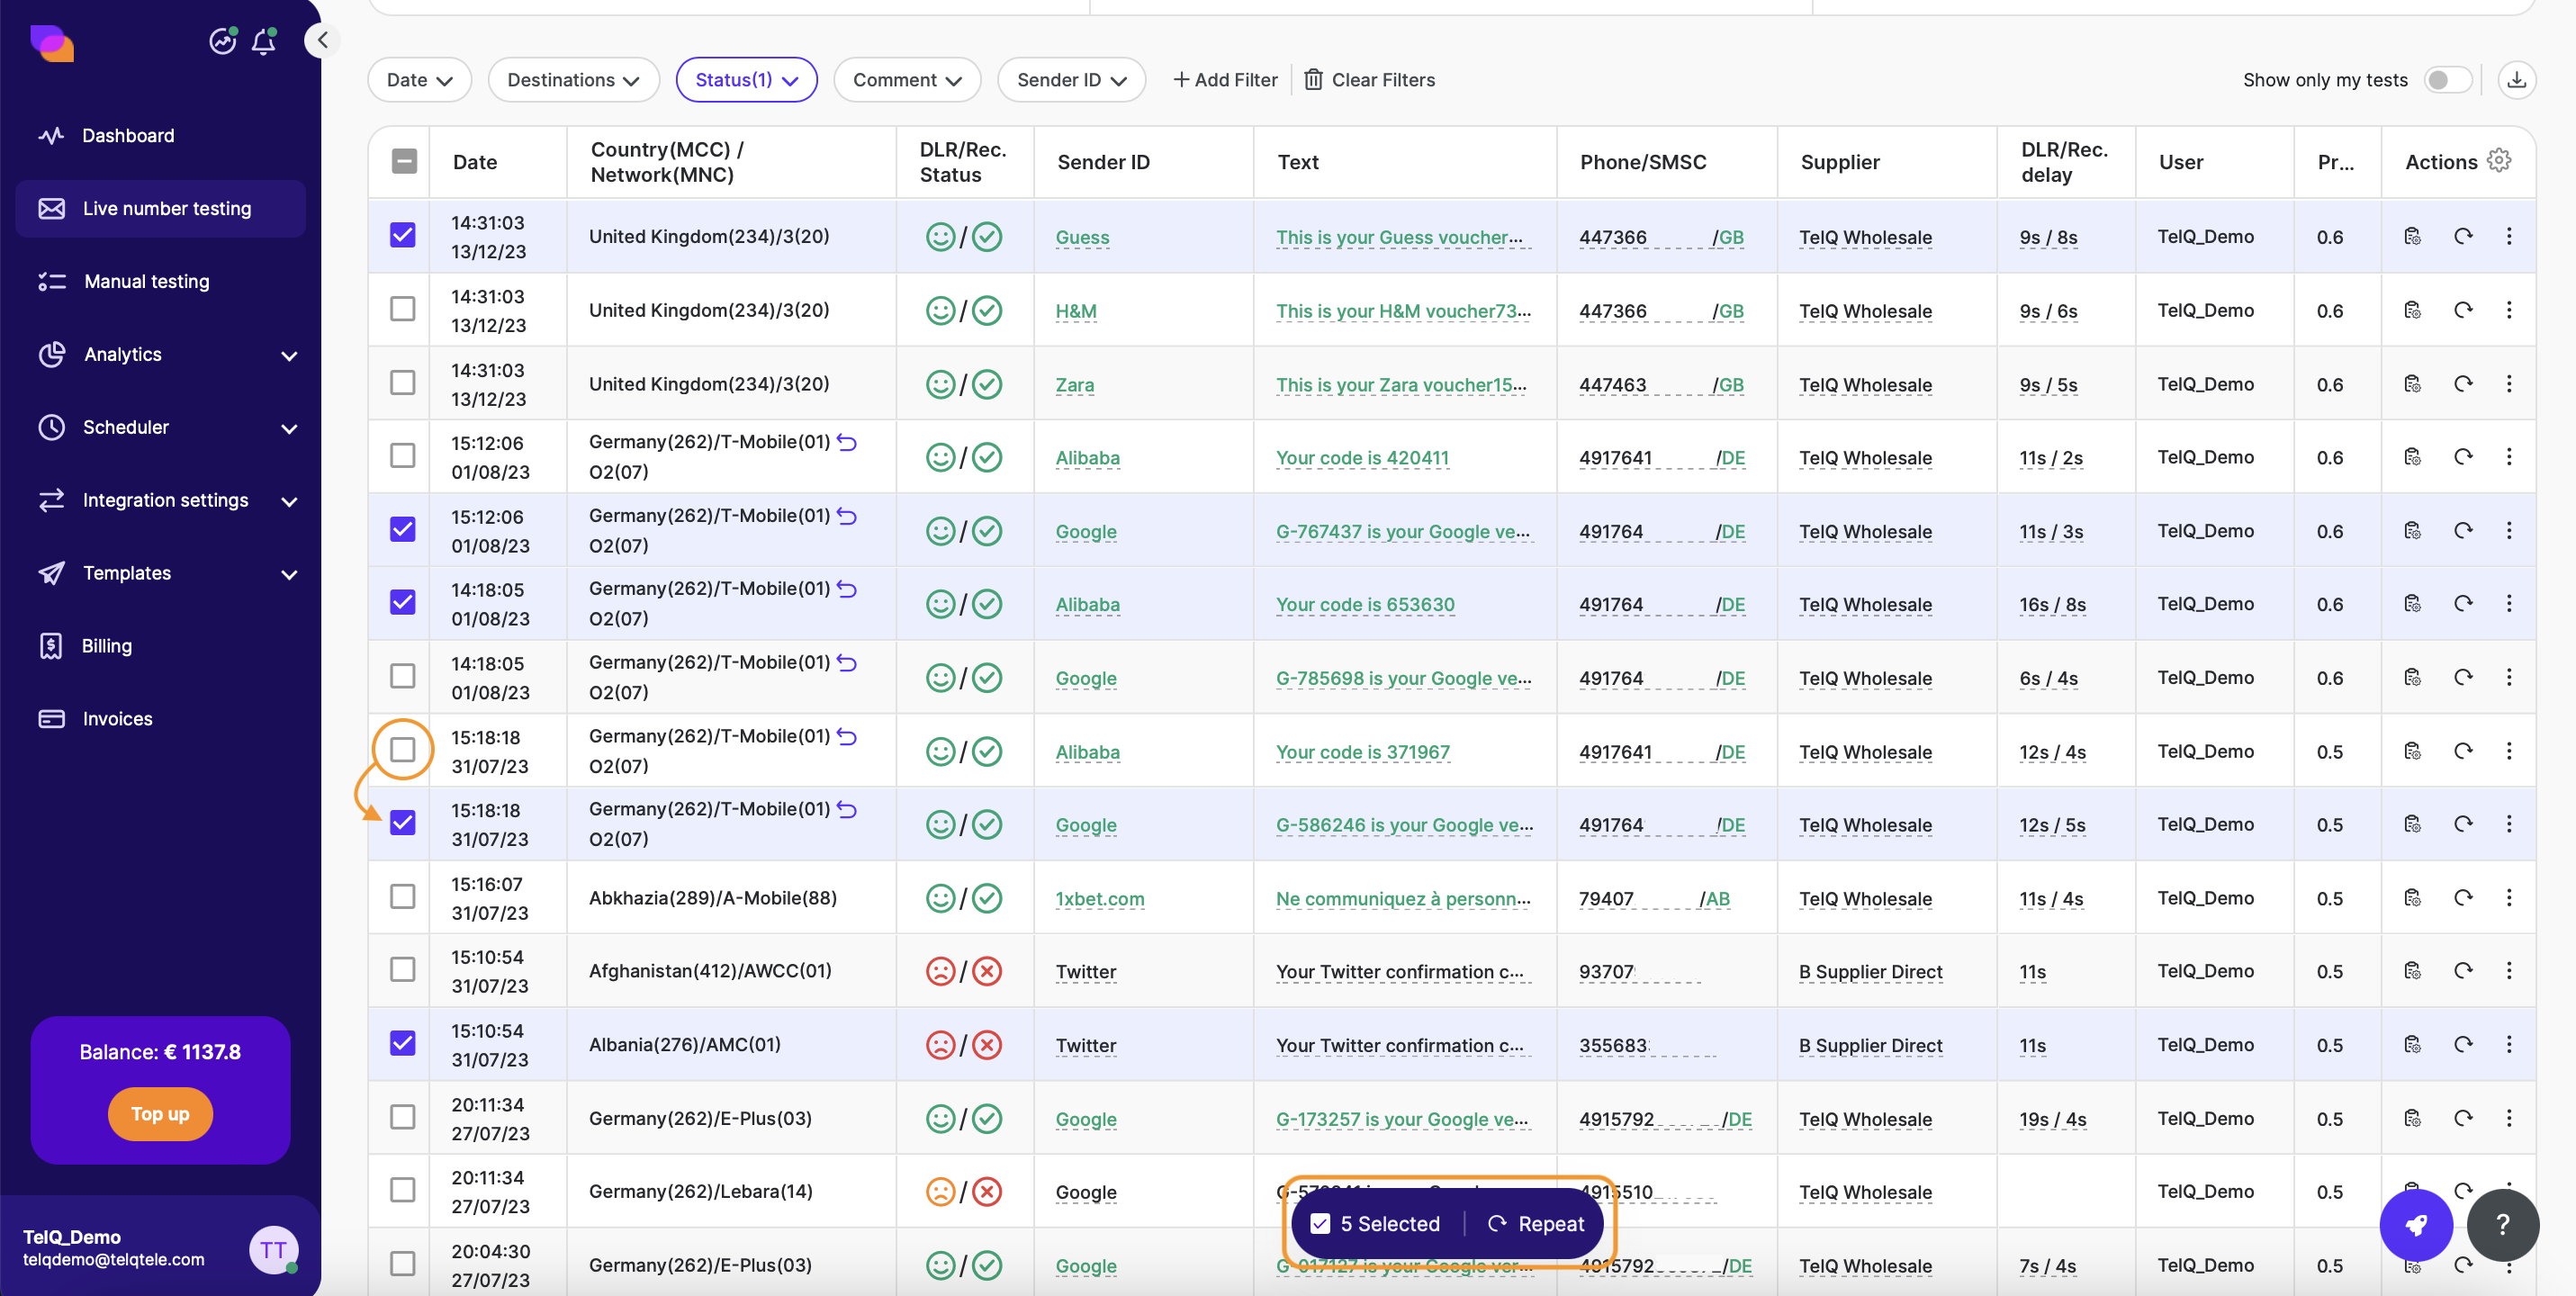
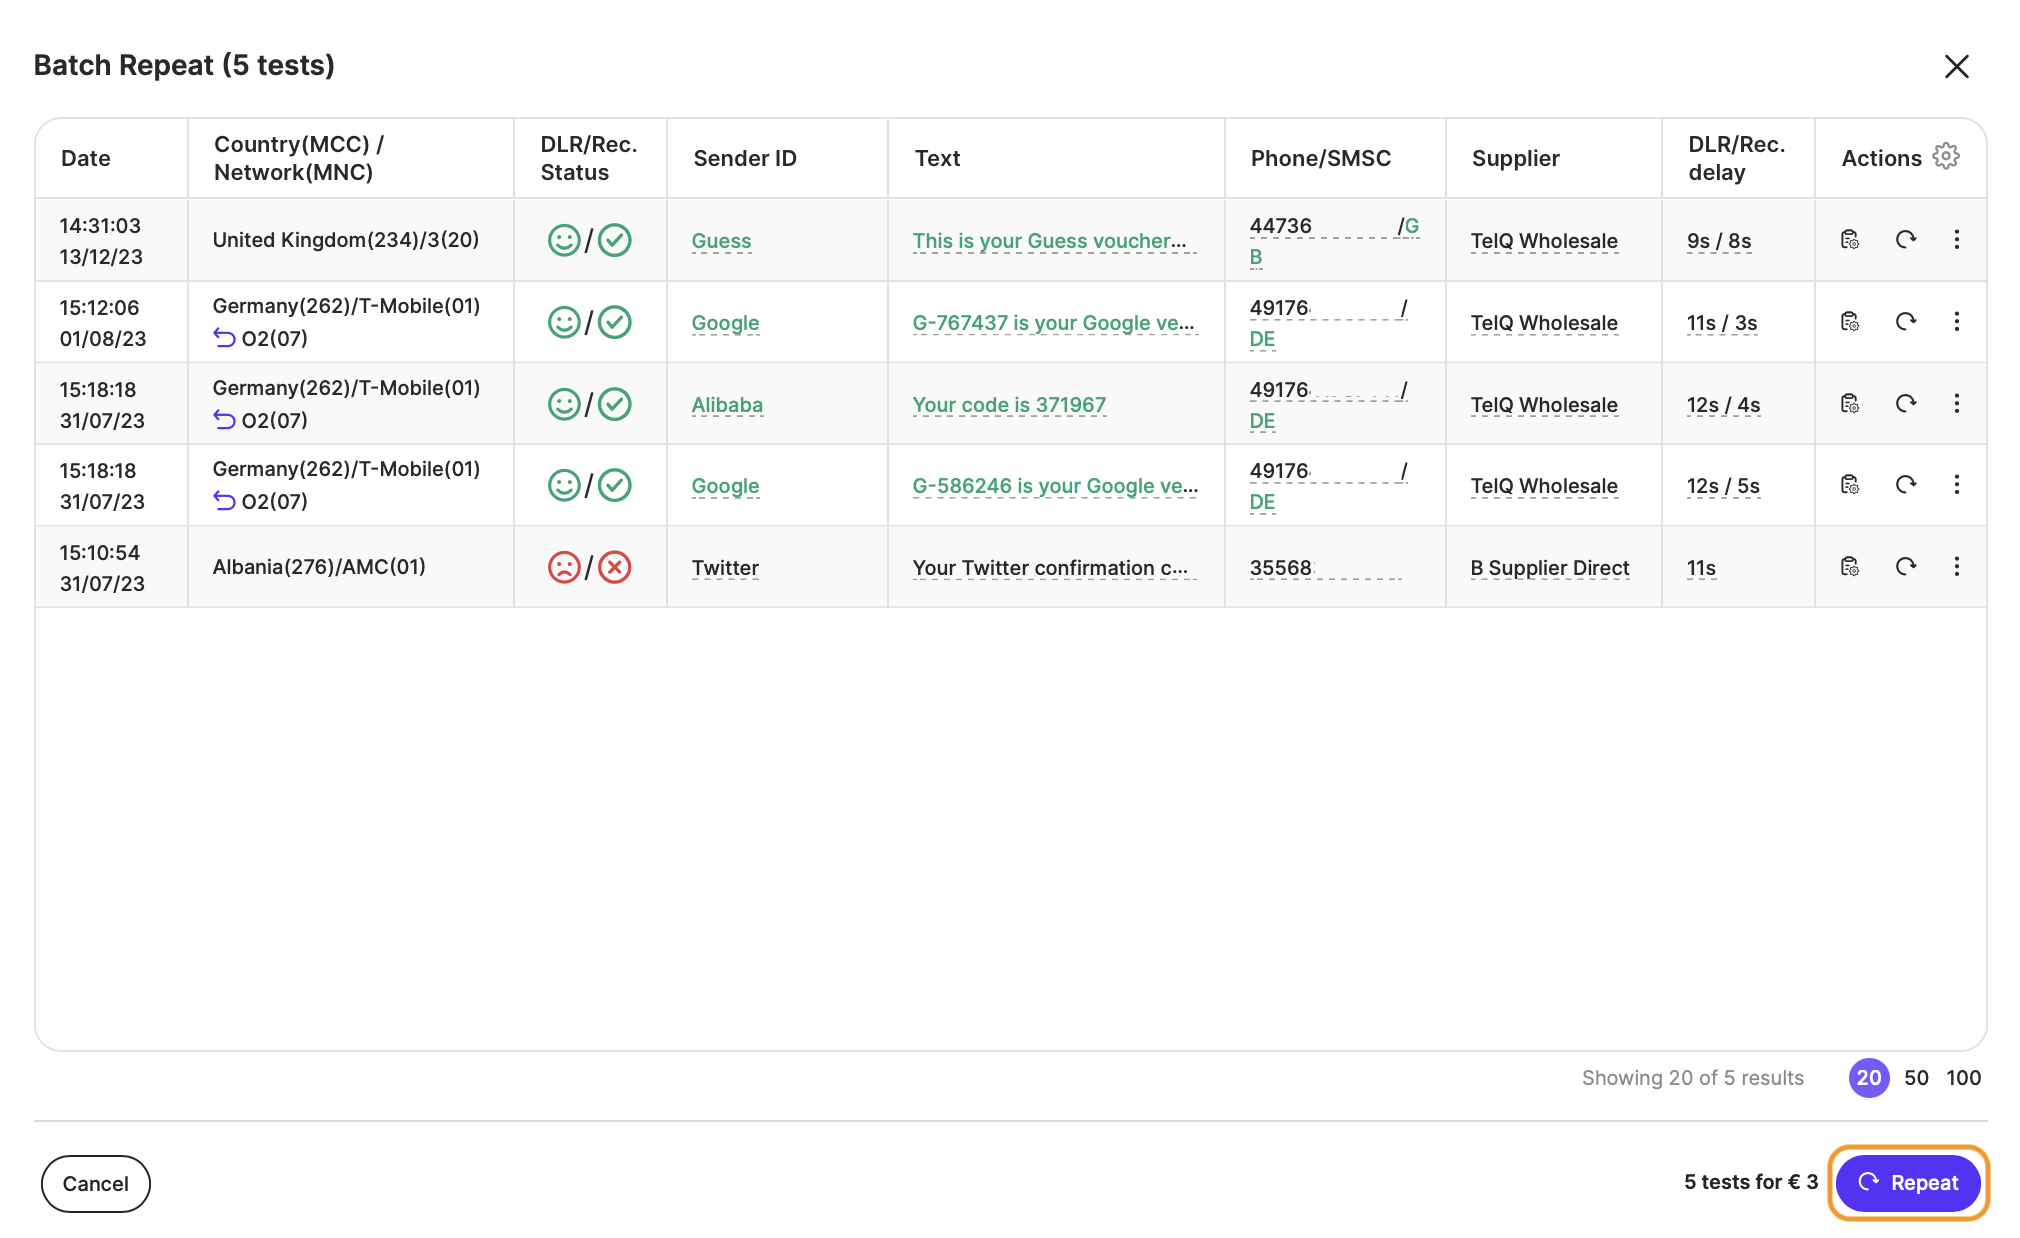
If you wish to repeat only 1 test from the Results section, or multiple tests from different batches, you can tick the checkbox(es) to the left of the test(s) and click the Repeat button to the bottom of the screen. Please note that the entries are not modifiable at this point. You can unselect the tests by clicking on “Select“ next to “Repeat“.
Clicking on the copy button will give you the test ID from the test case details which can be used for letting our support team know which tests to investigate.
Clicking on “Show/Add comment“ you can leave an individual comment for any test in your TelQ account, visible to all team members who see the test entry. Aside from leaving a comment in the Settings section before you test, by clicking on this option, you will be able to leave one even after you have submitted your batch. A test that has a comment will show this a blue dot above the three dots in the Actions column:

Please note that the comment cannot be edited or deleted once saved. The comment will also be included in the exported test results.
Clicking on “Phone number report“ you will be able to report a malfunction of the test number. If you click on it, a pop-up window will appear and you may select the suitable issue you suspect to be the problem for that particular test number. Here is a screenshot of the pop-up window:

Customizing the Results Table
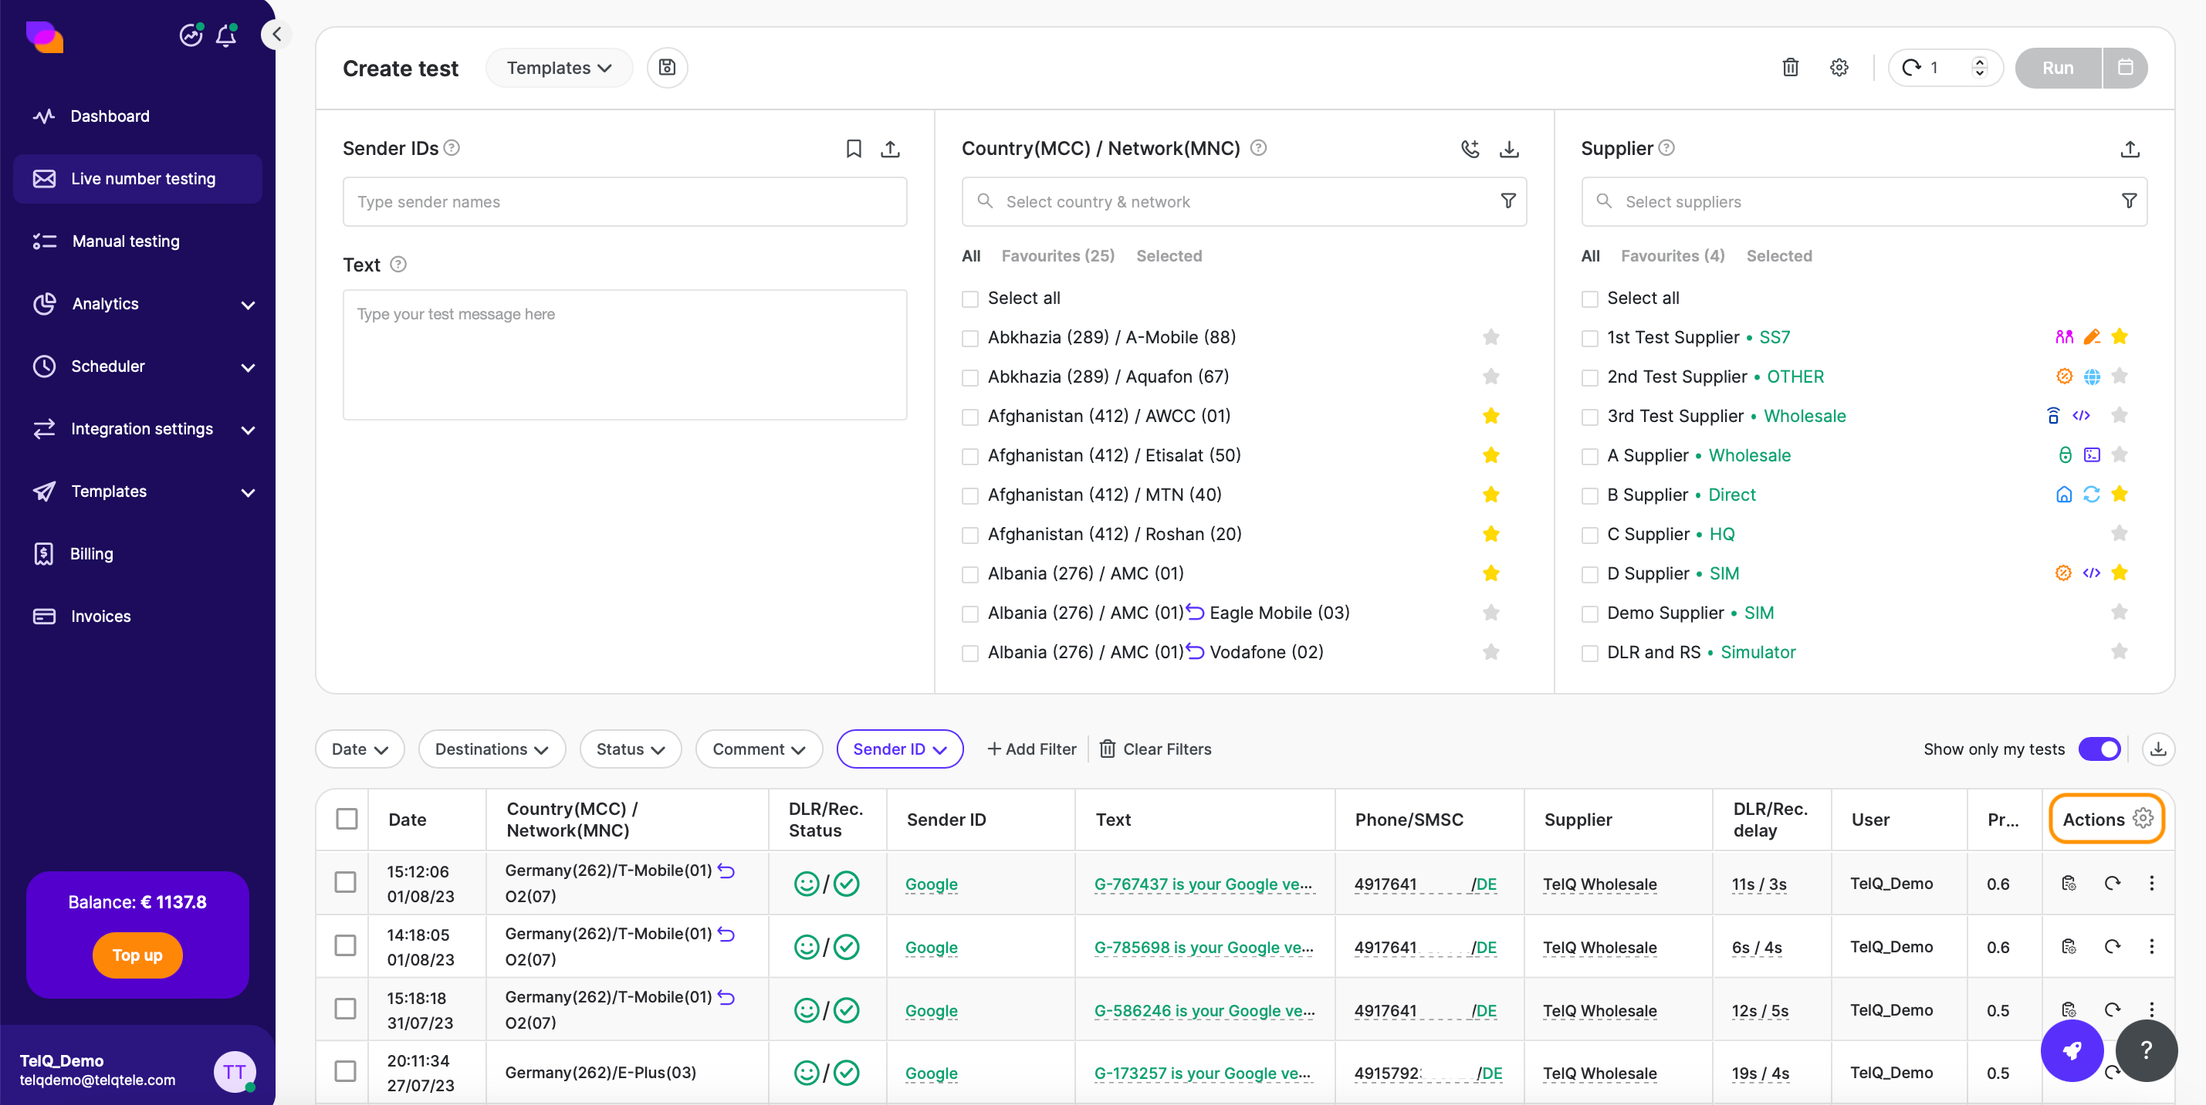
The columns in the Results section are modifiable and can be added or hidden by clicking on the gear icon next to “Actions“.
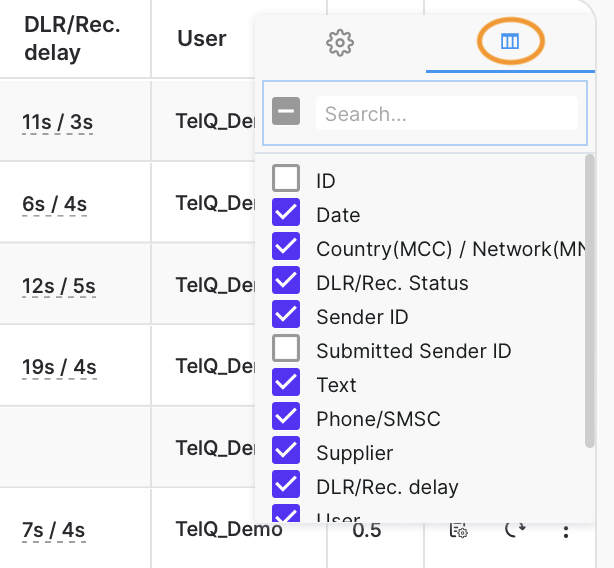
You can choose which columns you would like to see by marking the checkbox. Once a column’s checkbox is unchecked, that column will become hidden.
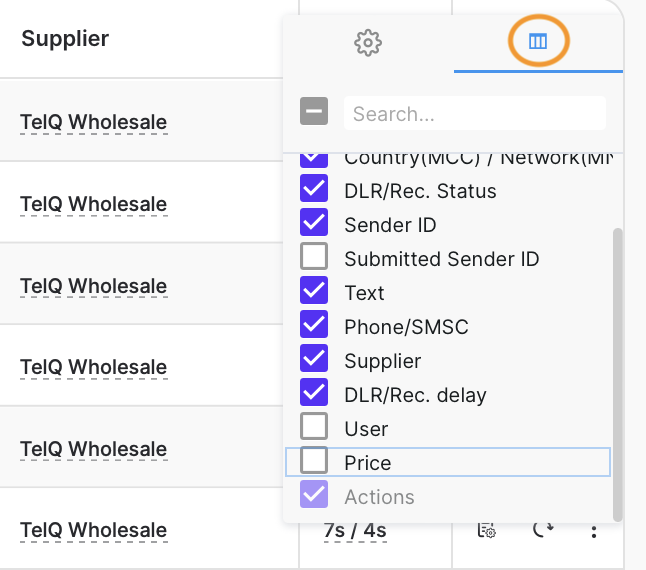
In this example, we unselected the User and Price column as they are not relevant for what we need to see and the aforementioned columns were removed (screenshot below).

If you need to rearrange the columns to make some information more prominent then the other, you can drag and drop the column(s) anywhere you’d like in the table.

Search and Filter
Between the Test Creation and Test Results sections you will find the Filters section which you can use to search or filter for specific tests. You can add the filters you need by clicking on the + Add Filter button:
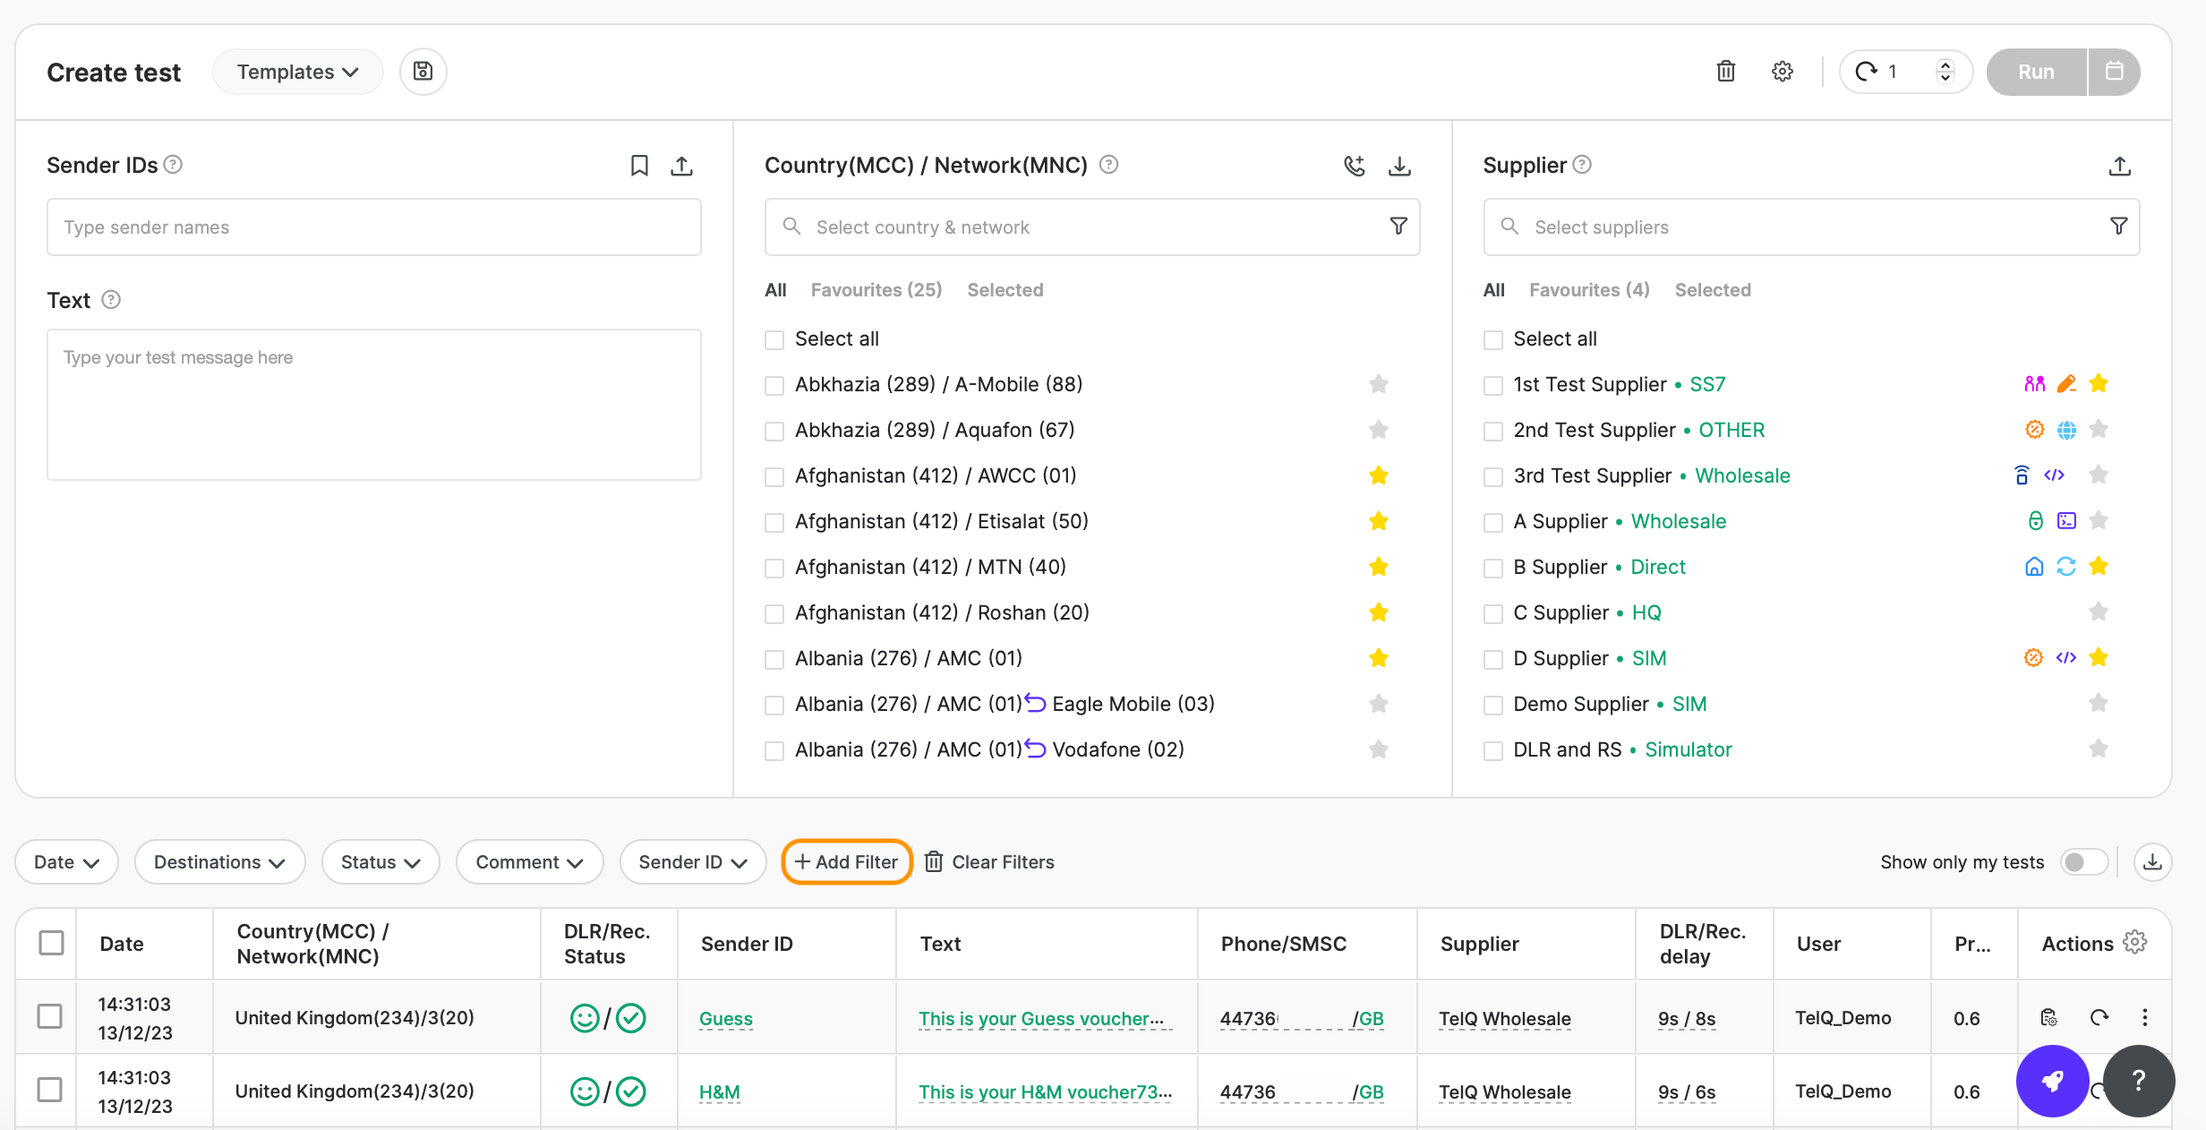
You can set up your search and filter criteria such as:
ID
Test ID Text
Sender ID
(Submitted) Text (without “Test ID Text“) - you can search by parts of the text that was sent, or the whole text without the Test ID Text
Date
Destination
Phone
Supplier
Status (both DLR and Receipt status)
Comment
Comment Date
User (Main account, deputy or subaccount that issued the tests)
TLV tag and value
You can clear the your search criteria by clicking on the “Clear Filter“ button, which will reset the filters and show all results again. To remove any filter from the bar, drag and drop it on the “Clear Filter button“.

If you don’t like the order in which the filters appear, you can rearrange them by dragging and dropping.
To see only your own test results, you can toggle the “Show only my tests“ option, which will overwrite the Users filter. If you need a quick filter on your own test results, you may use this option. This filter will stay active until disabled.
To download your test results in Excel (all or only the selected ones), click on the download icon.

Export:
