
Live Number Testing menu is an SMPP enabled setup that allows TelQ customers to check whether SMS messages are actually being delivered as expected. It works by sending messages from TelQ’s UI to your SMS platform, which then routes them through your supplier - just like your regular live traffic. The message is delivered to our test numbers, and we then compare what your supplier claims (DLRs, content, Sender ID) with what actually happens on our test devices.
The key advantage is that you get a side-by-side view of the supplier's delivery reports and message content versus the real result recorded by our test numbers so it’s easy to spot issues like:
-
Fake delivery reports (DLRs)
-
Changed Sender IDs
-
Modified or truncated message text
-
Slow delivery routes
To use this service, you need to set up an SMPP session with our testing platform. You can learn more about setting up an SMPP session on this page.
Creating tests
To send a test (or a batch of tests), you'll need to:
-
Input Sender ID(s)
-
Enter your message Text(s)
-
Select Destination(s) (target networks)
-
Choose the Supplier(s) you want to test with
-
Customize test batch settings (Optional)
-
Click the Run button and confirm sending the test(s)
You can select multiple Sender IDs, message texts, destinations, and suppliers in any combination.
If you choose several suppliers, each selected Sender/Text + Destination combination will be tested through every supplier you've selected. Near the Run button, you’ll see how many individual tests will be sent based on your configuration. When you click “Run”, a pop-up will show the test summary, total number of tests, and the cost. You can confirm or schedule the batch for later.
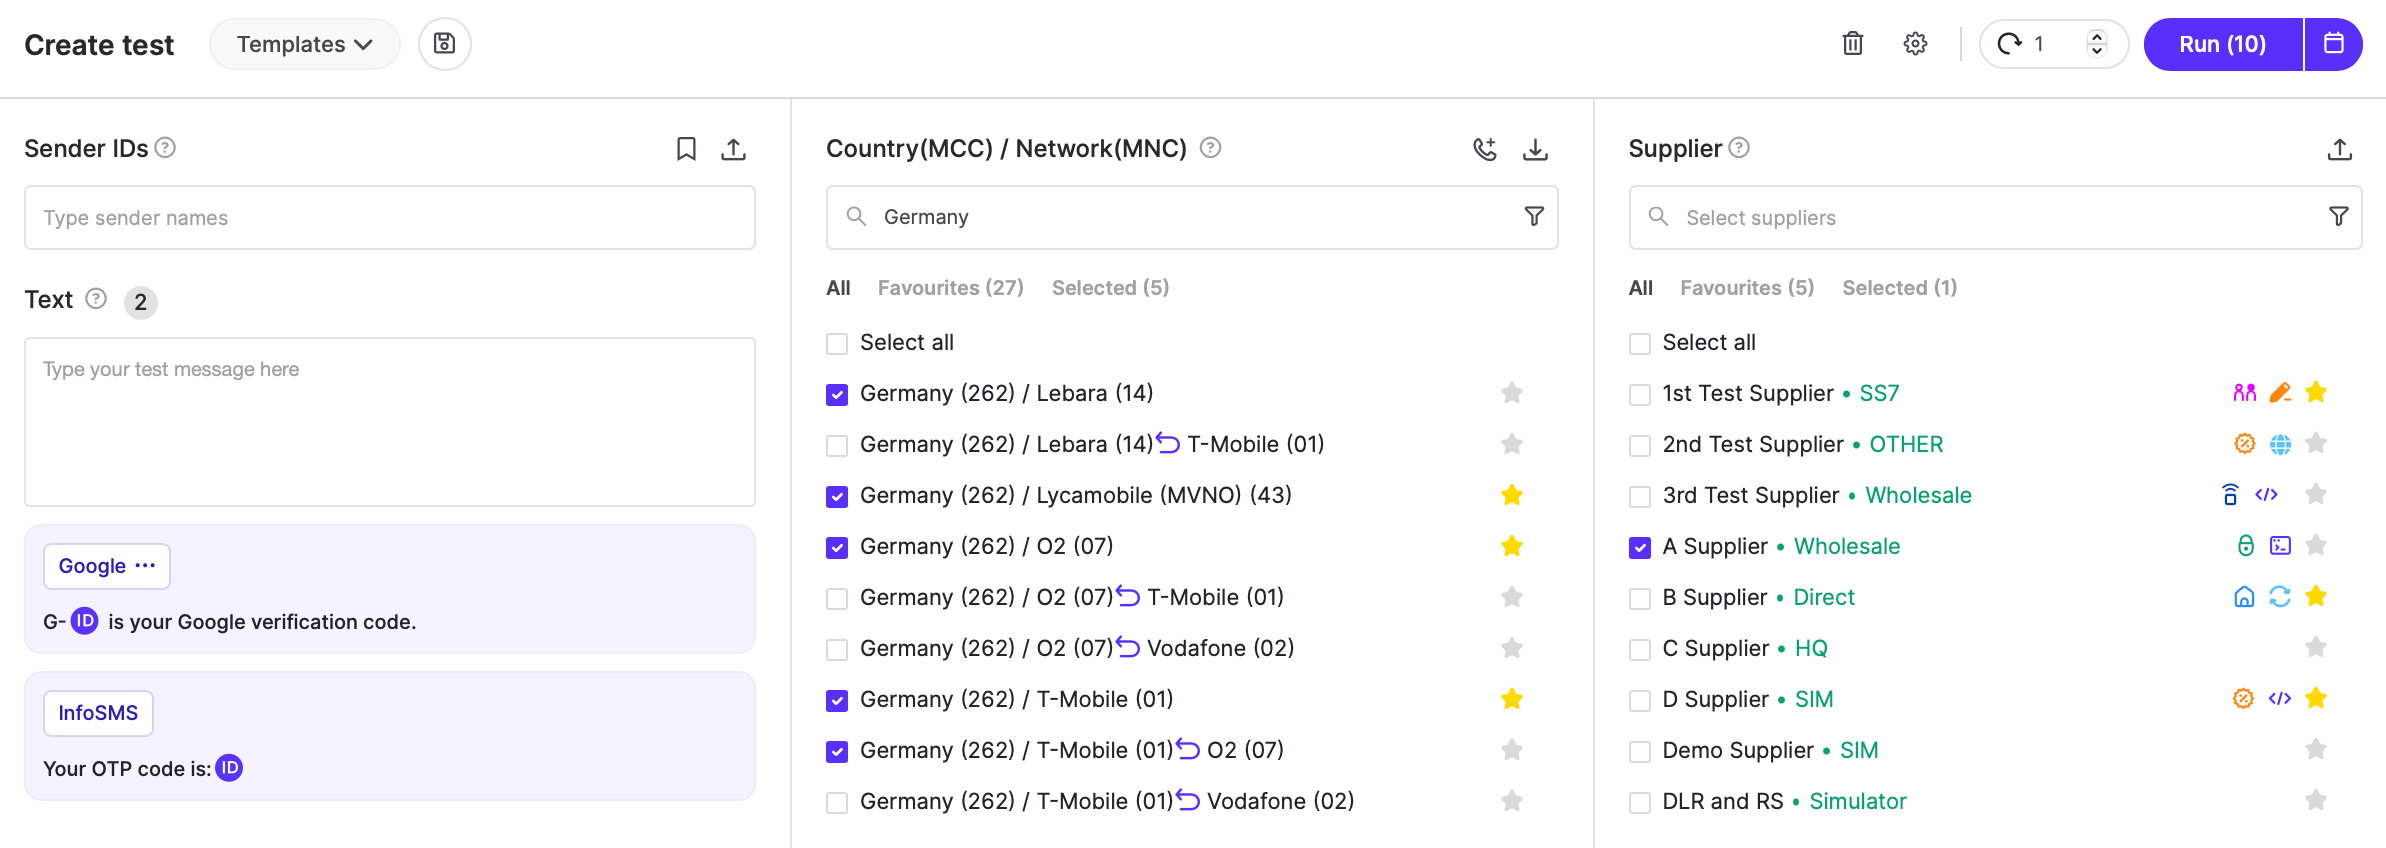
Repeat / Batch Testing
You can multiply the number of tests triggered by using the ‘Repeat’ counter next to the Run button.
Please note that, for security and error prevention, the following maximum values apply: a total of 8000 tests per batch, or a maximum Repeat value of 999 per test batch.
Important: The Repeat value will not be saved in Test Case templates or when using the repeat action button.
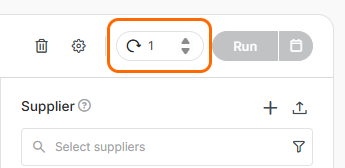
Templates
By clicking on the save icon, you can save your input (a combination of Sender ID, Texts, Destinations and Suppliers) as a Test Case Template and reuse it in the future. All the Test Case Templates you create will be available in the “Templates“ dropdown. For more information about templates click here.
Sender ID & Message Text Settings
You can define your Sender ID and message text in two ways:
-
Enter a custom Sender ID and Text
-
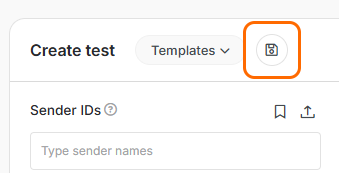
Use a suggested Sender ID & Text template
How It Works: When you start typing a Sender ID, the platform will automatically suggest any matching templates. These include Sender ID + Text combinations.
Some Sender IDs can be linked to multiple message texts. If a Sender ID has multiple texts, click the three dots icon next to it to choose the one(s) you want to use.
You can also enter your own custom Sender ID and message text manually, then click the plus (+) button to add them. Test ID text - automatically generated string or code will always be included in the message text.
A character counter and estimated encoding type appear below the text box to help you monitor message length and format.
Using Templates
You can browse all available Sender ID & Text templates by clicking the Bookmark icon.
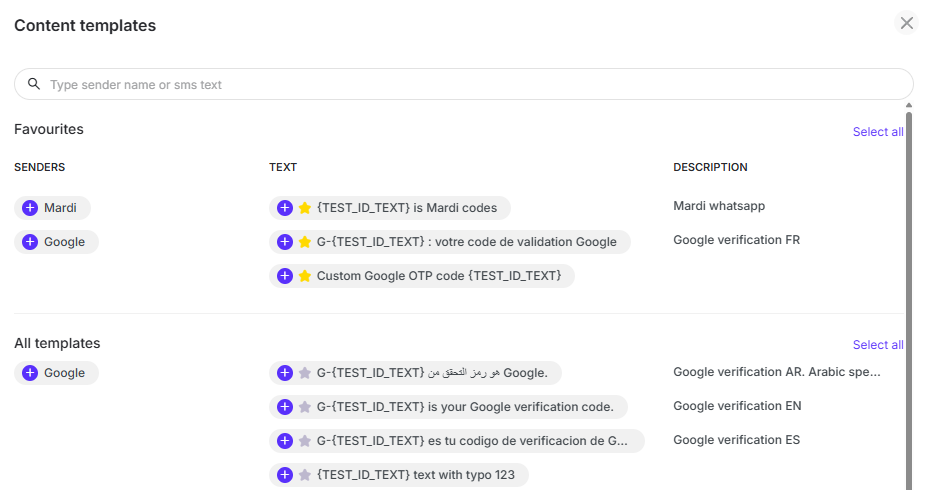
In the Content templates popup:
-
Select a template by clicking on it
-
Click the star icon to mark it as a favourite (favourites appear at the top)
-
Use the “x” button to remove a selection
-
Click “Done” to confirm your choices
Templates help speed up test creation, especially for recurring test cases or standardized messages.
Customizing Test ID Text
The Test ID Text is a unique code we generate for each individual test request. Our system uses this code in order to match the test results (delivered sms) with the test requests, as our test numbers are not exclusive per customer or request.
The Test ID Text needs to be present in the message body in order for the TelQ system to be able to retrieve accurate test results.
For Live number testing, the Test ID Text is added automatically in the message body.
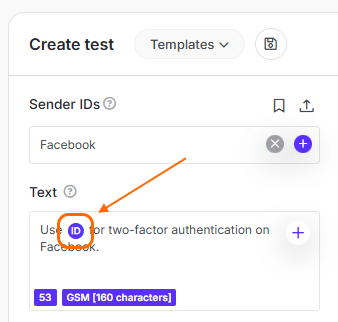
You can customize the Test ID Text by clicking the “ID” icon in the text field. You also can drag and drop the Test ID Text in any part of the message. If no position is selected, it will be added at the beginning of the text by default.
A pop-up will open where you can configure your Test ID Text settings:
-
ID type:
-
Alpha
-
Numeric
-
Alphanumeric
-
WhatsApp code
-
Instagram code
-
-
Character case: Upper, lower, or mixed (for Alpha/Alphanumeric)
-
Length: Between 4 and 20 characters
By default, the Test ID Text is a 6-digit numeric code. You’ll see a simulated preview of the Test ID Text format below. If you'd like to use your own format regularly, click “Save as default” to apply it by default for the future tests.
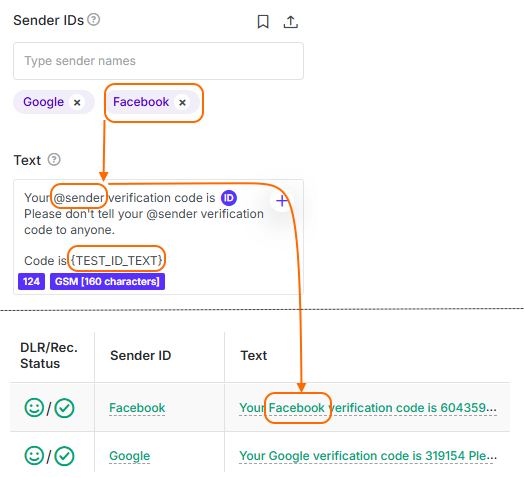
In case you need to duplicate the Test ID text in the message text, for instance, to repeat the same OTP code, you can indicate it by typing {TEST_ID_TEXT}.
For texts containing the Sender ID, you can test multiple Sender IDs at once, by using the @sender tag. Just enter the Sender IDs and place @sender in the text where each ID should appear.
Destinations
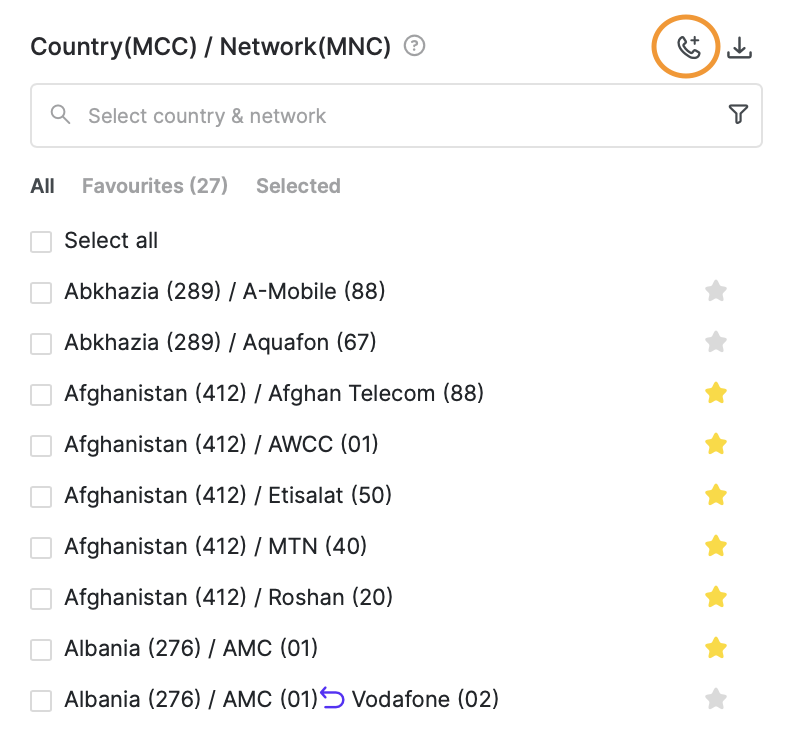
In this list, you’ll find all the destinations with currently available test numbers representing our real-time coverage.
You can search for destinations by by country or network name, or by MCC and MNC codes. Select individual destinations using the checkboxes, or use the Select All checkbox to select all visible entries. Your selections will remain active even after a new search. You can review and manage them in the “Selected” tab.
Use the star icon next to a destination to mark it as a favourite. These will appear in your Favourites tab for quicker access.
Filtering
Click the funnel icon to filter destinations by:
-
Ported or non-ported numbers
-
Numbers with RCS support
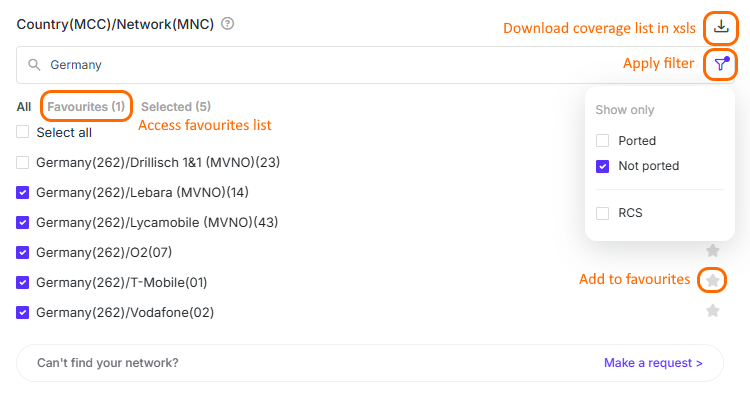
You can only apply one destination filter at a time - for example, you can filter by ported numbers or by RCS-capable numbers, but not both simultaneously.
To download the list of our available networks from the last 30 or 90 days, click the downward arrow icon in the corner.
Issue tests towards specific TelQ test numbers
We do not recommend testing specific test numbers instead of selecting a destination from the list for the following reasons:
-
we constantly check the availability of our test numbers and keep the coverage list updated
-
our algorithms ensure the selection of the optimal test number for your test, depending on its usage, probability of being whitelisted and its uptime
When you choose to test a specific test number, our algorithms and availability checks are being bypassed, so we cannot guarantee that the test number you chose to test is still available at the moment of the test and that it is functioning as expected.
If you choose to test a specific test numbers, please select a test number that was allocated to you by the TelQ algorithm in the last 24 hours, in order to comply with GDPR regulations. By bypassing our algorithm and testing custom numbers, you are also bypassing the check that the local partner has not withdrawn their consent of receiving TelQ messages.
Keeping in mind the above, you may issue a test towards a specific test number that was already allocated to you in past 24 hours tests by pressing the phone button in Destinations and pasting the test number in international format. For multiple test numbers, please write them one below the other as shown in the below screenshots:
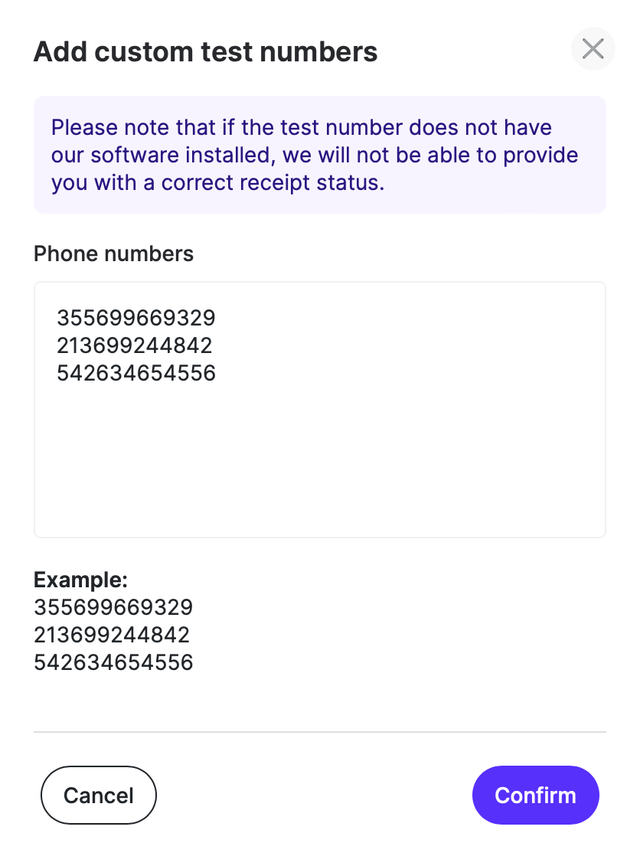
Although it is possible, we do not recommend testing external phone numbers because they do not have our software installed, so we cannot retrieve the Receipt confirmation from them (this means you will always see negative receipt status for these tests). We consider an external number a number which is not part of our test number pool.
Suppliers
This section displays all the suppliers you’ve set up in your account, along with our demo route - TelQ Wholesale. If you're new to our platform, make sure to configure your suppliers first by visiting the SMPP & Suppliers sections.
You may use TelQ Wholesale route in case you suspect one of our test numbers is not working properly and you can issue a test towards the same test number (as mentioned in “Issue tests towards specific TelQ test numbers”) via your supplier and TelQ route and compare the results.
Please note that the demo route TelQ Wholesale is set up for OTP content testing only and should be tested only with “Google” sender ID and Google specific OTP content.
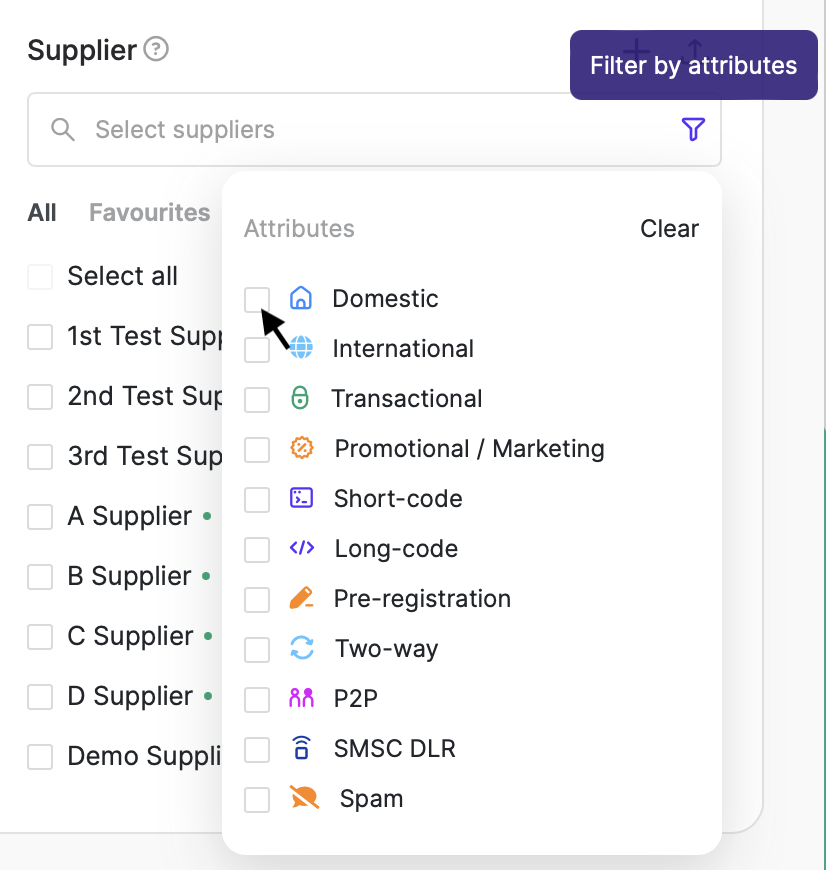
Finding and Filtering Suppliers
Use the search bar to find suppliers by name, partial name, or route type. To filter suppliers based on their attributes (e.g., Domestic vs International), click the funnel icon and choose the relevant options.
Favourites and Selection
Click the star icon to mark frequently used suppliers as favourites - they’ll appear in the Favourites tab for quick access.
To manage your current selection, click the Selected tab where you can review, remove, or modify the suppliers chosen for your test batch.
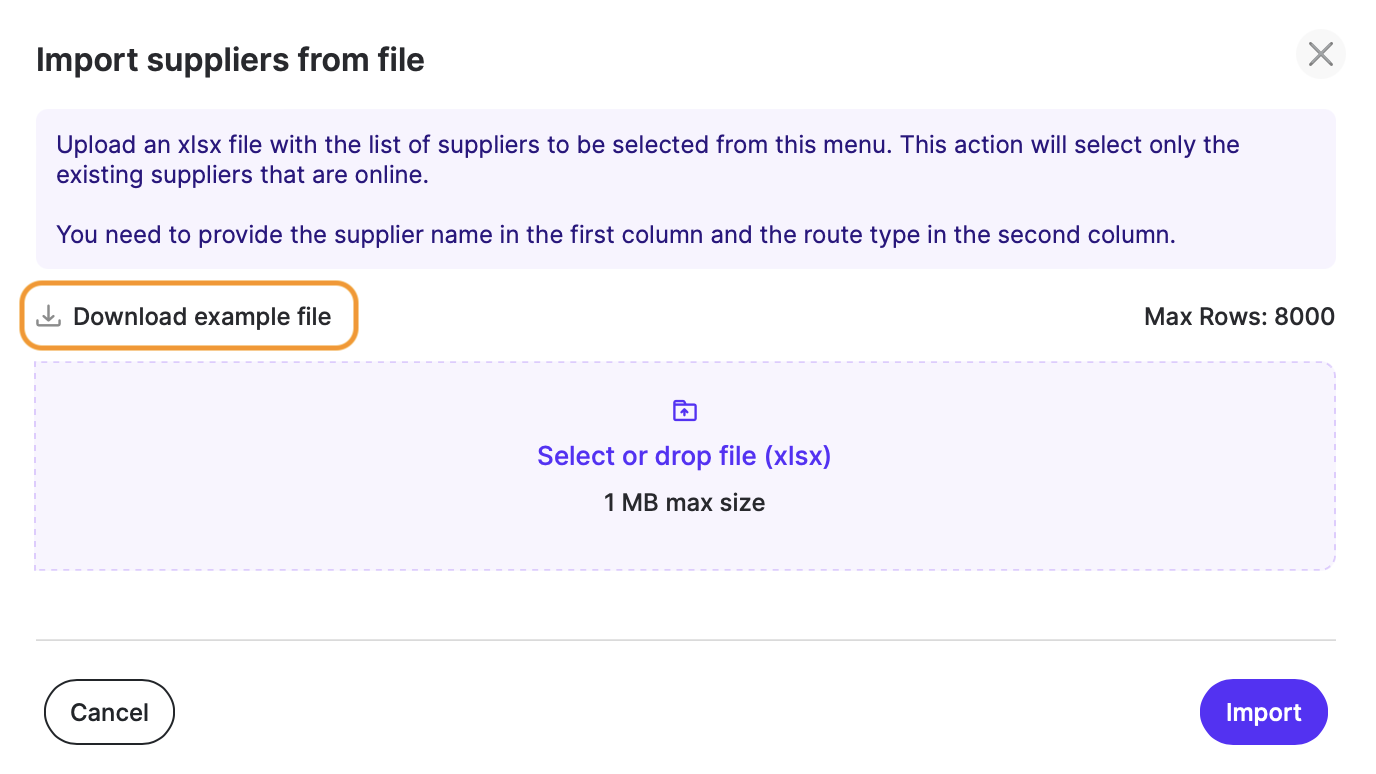
Bulk Selection via Excel
If you need to select multiple suppliers quickly, use the Import from Excel feature. Download the example file, enter your supplier details, and upload it to populate your list automatically. You can download our example file and import the list as shown in the screenshot below:
Additional Settings
Expand to read about additional settings
The Settings panel (gear icon) gives you more control over how your tests are sent. It contains 5 tabs for fine-tuning various parameters.

Sender ID & Content
This tab allows you to adjust key settings that affect how your sender information and message content are handled.
Please note: All of these values can be selected manually from a dropdown menu. If you choose "Automatic", the system will set the best option based on the format of your Sender ID - so you don’t need to worry about technical details unless you have specific needs.
-
Source TON (Type of Number)
This tells the system what kind of number your Sender ID is - whether it’s a short code, a full international number, or just a text name (alphanumeric).-
Example: “MyBrand” uses a different type than “+123456789”.
-
-
Source NPI (Numbering Plan Indicator)
This helps define which numbering system your Sender ID follows - international or national formats. It ensures the message is understood correctly by the receiving network. -
Data Coding
This controls how your message text is encoded. It affects whether special characters like emojis, accents, or non-Latin scripts (e.g. Arabic, Chinese) are displayed properly.-
Data Coding is set based on the content, not the Sender ID.
-
Choose this carefully if your message contains special characters.
-
Timing & Delivery
This tab lets you control when and how your SMS tests are processed by the SMS Center. These settings affect delivery timing, message lifespan, and behavior in special cases.
-
TTL (Time-to-Live)
This defines how long our system will wait for a final delivery status (receipt) before marking the test as failed.-
This setting overrides the default TTL of the parent account, or the TelQ default value of 60 minutes.
-
We highly recommend setting TTL to at least 10 minutes to allow for temporary availability issues.
-
Useful if you want faster test results or are dealing with slow routes.
-
-
Validity Period (SMPP)
This sets a time limit for message delivery on the SMSC side. If the message isn't delivered within this time, it gets deleted. Expressed in seconds.-
Note: In case the validity period is longer than the TTL, the SMS might be delivered after the test TTL has expired and in such case, the delivery will not be reflected in the test result.
-
-
Scheduled Delivery Time
Lets you choose a specific time for the SMS to be scheduled for delivery by the SMSC, instead of sending it immediately.-
Helpful for testing delivery behavior during peak or off-peak hours.
-
-
Replace If Present Flag
If enabled, this tells the system to replace any earlier message sent with the same source/destination address and service type.-
Default: Off (0)
-
-
Priority Flag
Sets how urgent the message is for the SMSC.-
Range: 0 (lowest) to 3 (highest)
-
Default: 1 (normal priority)
-
UDH (User Data Header)
Use this tab if you want to add custom UDH fields to your SMS. UDH is a special part of an SMS that allows you to add extra instructions or data - like telling the system that your message is part of a longer, multi-part SMS (concatenated SMS). It's mainly used when you want to control how the message is displayed or handled.
UDH can be used:
-
to form Concatenated SMS,
-
to enrich the content of the message with colors, text formatting, small pictures and animations and simple music which are used in Enhanced Messaging Service (EMS),
-
to convey port numbers which may cause start of an application in the mobile phone, which is used for Multimedia Messaging Service (MMS)
-
or to indicate using of national language shift tables.
UDH is split into several Octet as you can see in the example below. While the length is being calculated automatically by TelQ platform, the other fields have to be filled in by the customers.

Below is an example of how the full UDH 06080400010201 has to be split in order to send it through our system.
06: UDH Length. Calculated automatically and does not need to be entered.
08: IEI Concatenated short message. Refers to 16 bit reference number. Needs to be added to the tag section.
04: IE Length. Calculated automatically and does not need to be entered.
0001: Message reference. Needs to be added to the value section.
02: Refers to the total number of parts. Needs to be added to the value section.
01: Refers to the part number. Needs to be added to the value section.
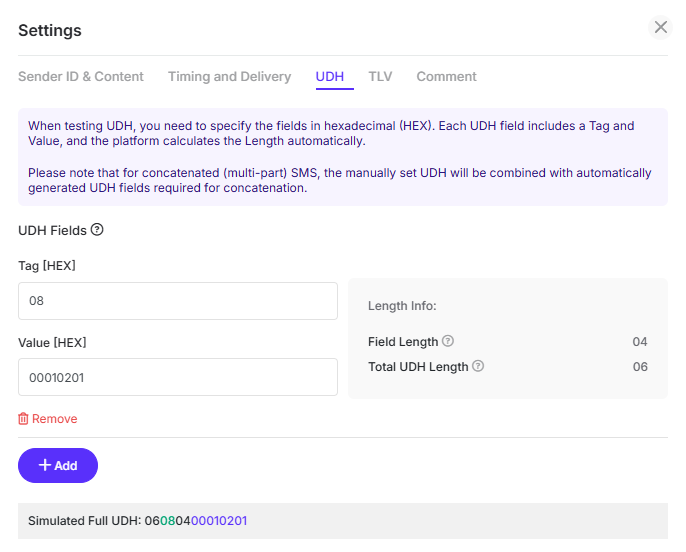
UDH fields must be entered in hexadecimal (HEX) format. Each field consists of a Tag (defines the type of data) and Value (actual data in HEX) - the system will automatically calculate the Length for you.
If you're sending a concatenated (multi-part) SMS, your custom UDH will be combined with the platform’s auto-generated UDH for proper message splitting.
TLV (Tag-Length-Value)
TLV (Tag-Length-Value) is a format used to include extra information in your SMS that isn't part of the message text itself. It’s often used for technical or routing-related details. TLVs can help with sending longer messages (beyond the SMS size limit), special character support, or telling the system how to process the message. This tab lets you define TLV parameters, also in hexadecimal (HEX).
Send text as message_payload TLV option allows you to send your message text as a TLV (instead of in the standard field).
Comment
Use this tab to add a comment about the test. Your comment will be visible to all team members who can access the test. Comments are also searchable in test results, making it easier to track specific cases or internal notes. You can always add a comment later from the test results table.
Interpretation of Test Results
Columns Explanation
Note: Some columns are hidden by default. You can display them by selecting these columns in the actions menu under the cog icon => column selection.
ID: A unique identifier assigned to each test request. This ID helps you track, reference, and troubleshoot individual tests in the system.
Date: Shows when the test was created — more precisely, when the Test ID Text was issued. Timestamp reflects your browser’s time zone.
UTC Date: The precise timestamp when the test request was initiated, displayed in Coordinated Universal Time (UTC). Using UTC ensures that the timing is standardized, regardless of the browser’s local time zone.
Country (MCC) / Network (MNC): Indicates the destination country and mobile network tested. Based on the selected destination during test setup.
DLR / Rec. Status: DLR: The delivery report received from your supplier via SMPP. Rec. Status: The actual result from our test number (what happened on the handset). Hover over the status icons or click Help bubble for more details.
Sender ID: Displays the Sender ID that was sent and the Sender ID that was delivered. In case the delivered one was modified, we highlight it and the show the original Sender ID value in hover-over tooltip. Clicking on the Sender ID you will be able to see more detailed information. Color coding to interpretate the result:
-
Green: the test reached our test number and the Sender ID submitted was identical to the Sender ID received
-
Red: the test reached our test number but the Sender ID received by our test number was different from the Sender ID submitted.
-
Black: the test did not reach our test number.
Text: Shows the message text sent and what was actually received by our test number. Same color coding as Sender ID for clarity.
Phone/SMSC: Displays the test number that received the message and the SMS center (SMSC) that delivered the message. You can display Phone and SMSC columns separately by selecting them in the actions menu under the column selection. Color coding for SMSC value:
-
Green: SMSC country matches destination
-
Red: Country mismatch
Please note: the SMSC information is provided by the mobile network operator and in case the MNO did not provide this information when delivering the message, we cannot retrieve the SMSC info and therefore it will not be displayed.
If the test is successfully received by our test number and the SMSC value is shared by the MNO in the PDU, we automatically and free of charge run an HLR query on it in order to retrieve more information about it: MCC, MNC and provider for that particular SMSC value.
This information should assist you in detecting if your vendor is using a direct route or to identify the SMSC owner.
Supplier: The supplier used for sending the test.
DLR / Rec. Delay: Shows the delay in delivery for both DLR and Receipt status. Clickable to view detailed latency breakdown and timestamps.
User: The user that created the test.
Test Statuses Explanation
SMPP DLR Statuses
Receipt Statuses
Test Statuses: Understanding DLR, Receipt Status & Fake DLRs
The DLR/Rec. Status column shows two key pieces of information: the DLR (Delivery Report) provided by your supplier, and the Receipt Status reported by our test device. These two values are often your most important indicators of route quality and delivery accuracy.
The DLR reflects what your supplier claims happened to the SMS - typically whether it was delivered, failed, or still pending.
In contrast, the Receipt Status is based on the actual response from our test number. This status confirms whether the message was truly received on the handset. It is independent of the supplier’s DLR and it helps you detect whether the message reached the device, and whether the Sender ID or message content was changed along the way.
One of the most important use cases of the comparison between DLR and Rec.status is spotting Fake DLRs. A Fake DLR occurs when your supplier marks the message as delivered, but our test number shows no evidence of receiving it.

This means the supplier has likely returned a false delivery confirmation, which is a serious quality issue. These cases are clearly visible when the DLR says "Delivered" but the Receipt Status indicates failure or no receipt.
Statuses are updated in real time. This means that intermediate values like Pending, Wait, or Test number not available will automatically update as soon as we receive a response from the test number. If the test number is temporarily offline and doesn’t respond for more than 4 minutes, it is marked as unavailable and removed from the testing pool to maintain accuracy.
You can control how long our platform waits for a final result using the TTL (Time-to-Live) setting. This can be configured per test before launch or globally in your Account Settings (60 minutes by default). We recommend setting TTL to at least 10 minutes to allow for temporary availability issues. If the test number doesn’t come back online within the TTL window, the Receipt Status will change to “Test number offline”, and your test credit will be refunded - unless a backup test was also attempted and failed.
Important: Never escalate TelQ test numbers to your suppliers. Doing so alerts them that the number is being monitored, and they may whitelist it - making future tests unreliable. This not only affects your own testing but also impacts platform-wide integrity and cost.
Back-up tests
If our test number goes unavailable during your test request, we try to find an alternative test number belonging to the same destination and send a clone of your initial test to this new number.
This is what we refer to as “backup test” - it’s automatic and free of charge (as you were already billed for the initial test) and can be switched off in case you do not require this option.
In order to check this option and to enable/disable it, please login in your Admin account and access Account settings / My Account and in the bottom left corner of the page you will see find the button for Backup tests. Don’t forget to click on Apply after modifying it.
If there is no other available test number of the same destination or you switched off the backup test feature, we will return to your account the credit that was previously charged for your initial test.
Below, you can see how a back-up test is displayed within the test results. To view both the original and back-up test, click on the '+' action button as indicated on the screenshot:

Both tests will then be displayed:

Latency & Delivery Delays
The DLR/Rec. Delay column in your test results shows how long it took for the message to be confirmed as delivered - both from your supplier’s side (DLR) and from our test number (Rec. status). This timing information helps you evaluate the speed and efficiency of message delivery through different suppliers and routes.
When you click on the values in this column, you’ll see a detailed breakdown of the timestamps involved in sending and receiving the test message. These delays are shown using colored bars and time markers that help you visually understand the flow of the SMS through the system.
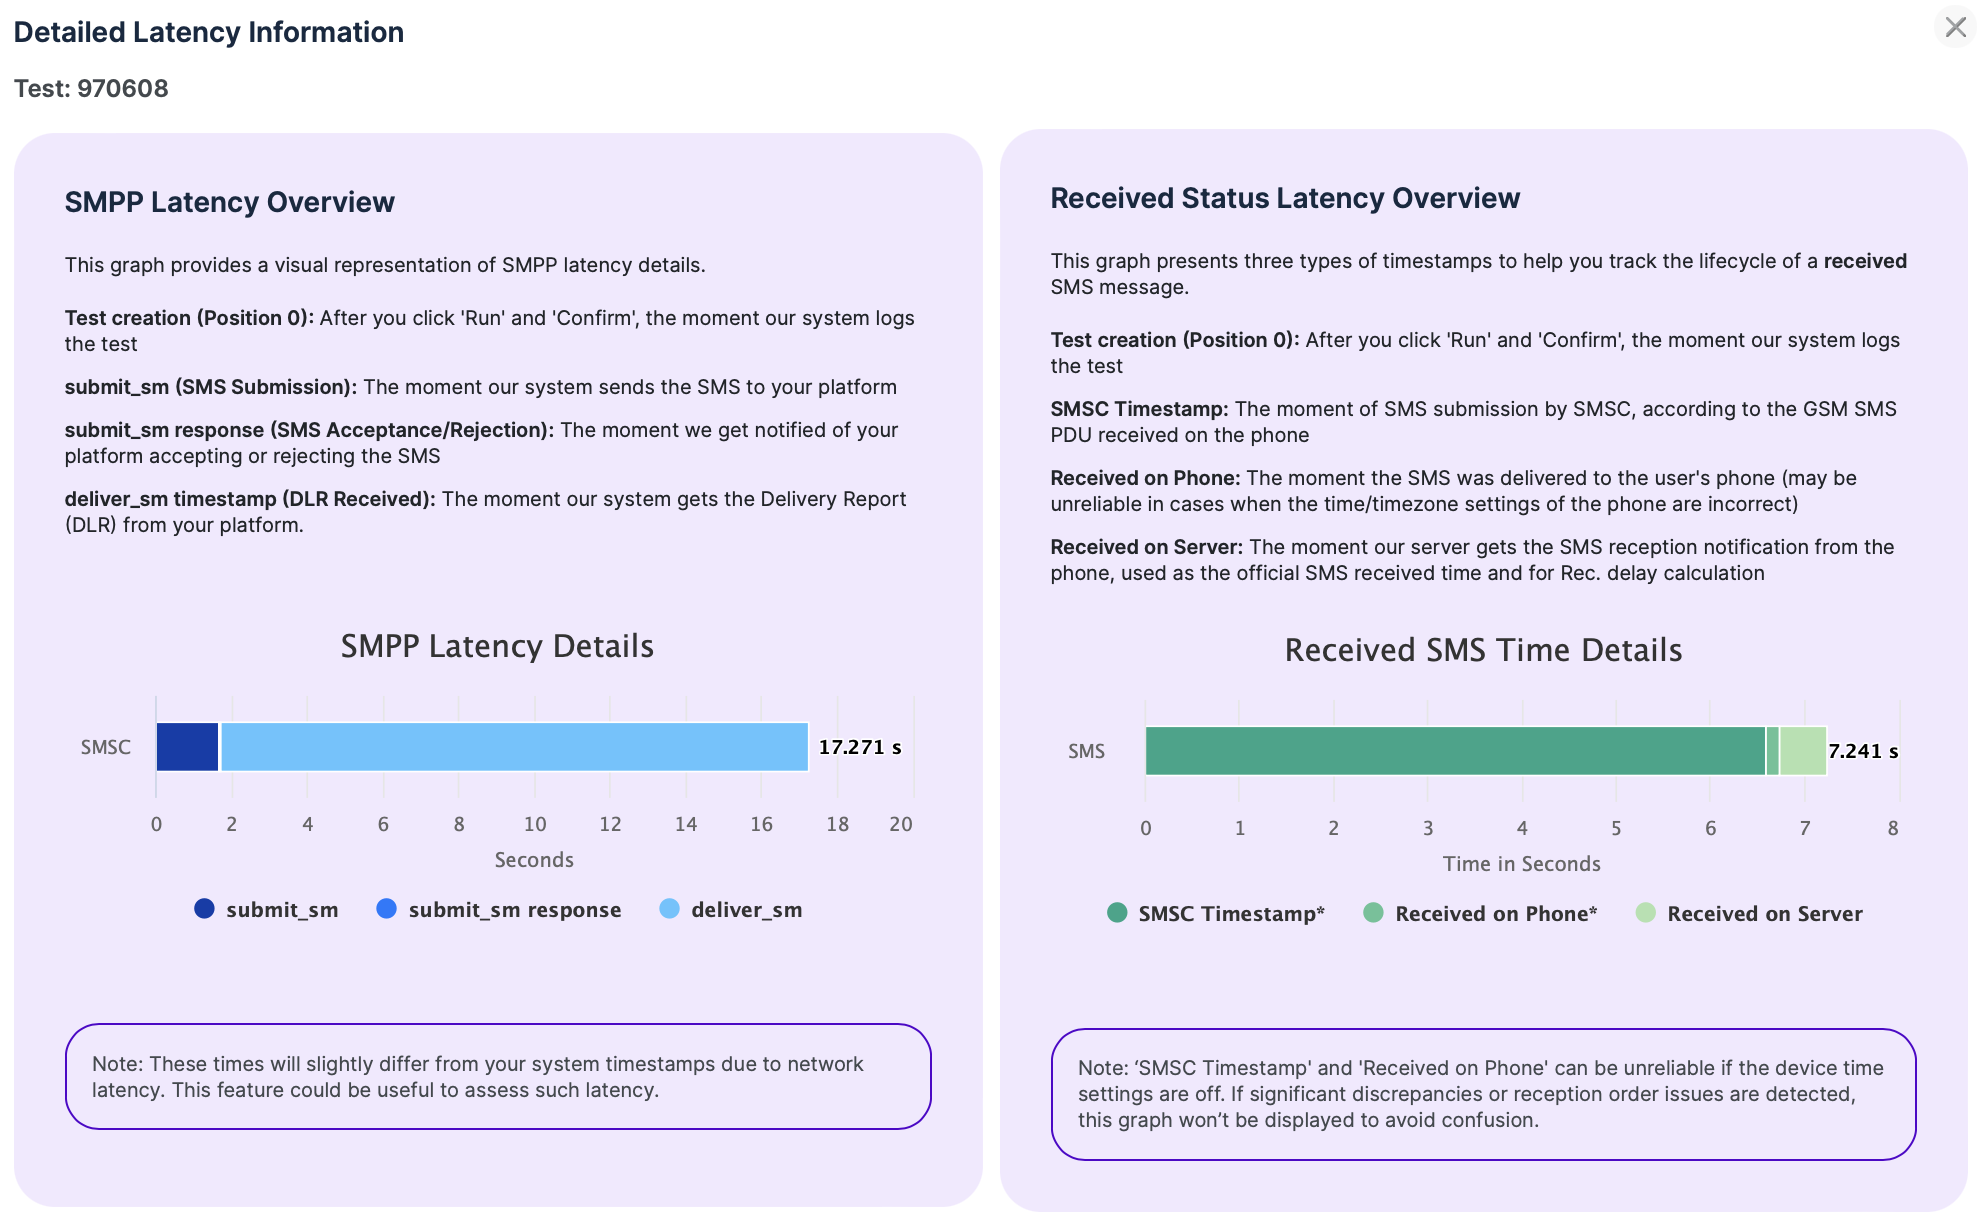
SMPP (DLR) Timestamps
Receipt (Device) Timestamps
Filters, Table Customization & Export
The Results section offers flexible tools to help you search, organize, and export your test data—making it easier to find what matters and analyze performance.
Filtering Test Results
Use the Filters panel located between the Test Creation and Test Results sections to narrow down your view if you need. You can filter results by almost any parameter from Test Results table.
Click + Add Filter to apply a new filter. Filters can be rearranged by dragging and dropping. Use “Clear Filter” to reset all filters. Drag a filter onto the button to remove it individually.

For a quick view of your own tests only, toggle “Show only my tests” - this overrides the User filter until disabled.
Destination Filter Ported Number Options
Expand to read about Destination Filter
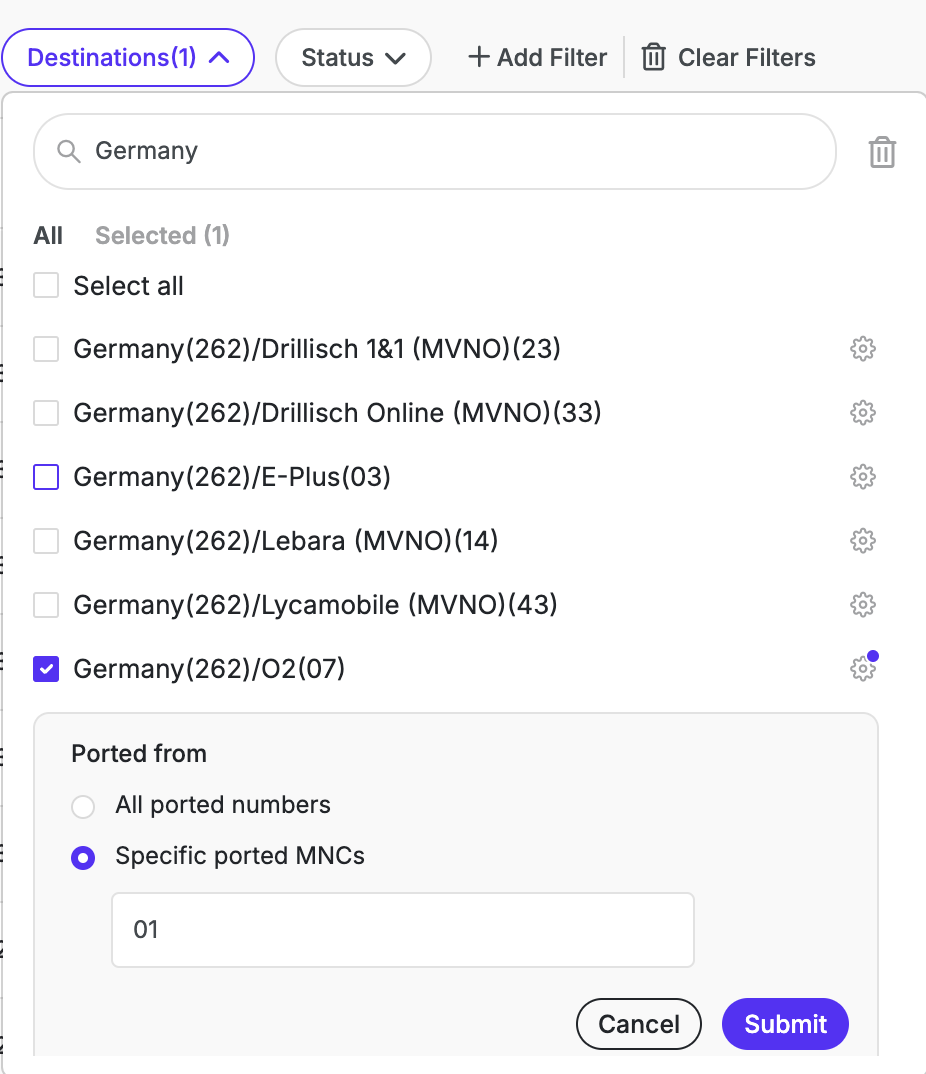
The Destination Filter helps you narrow down which results are shown in the results table and have an option to select destinations with specific original MNCs.
Ported Number Options
Click the gear icon next to a network to access ported number filters:
-
All ported numbers (default):
Shows results for all numbers currently belonging to the selected network, regardless of their original MNC. -
Specific ported MNCs:
Lets you enter one or more original MNCs to view results only for numbers ported from specific networks. Multiple MNCs can be separated by commas.
When a custom MNC filter is applied, a purple dot appears next to the gear icon to indicate non-default settings.
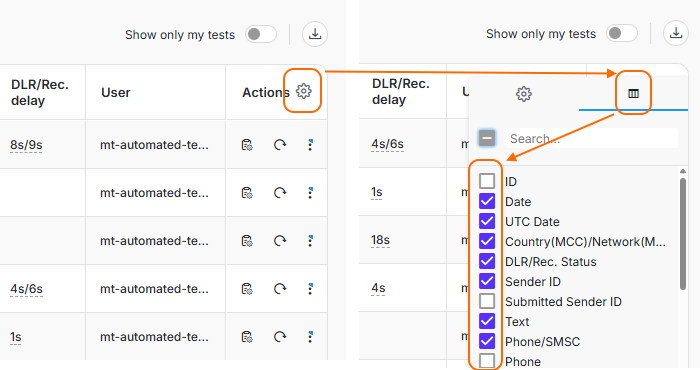
Customizing the Results Table
You can adjust which columns appear in the Results table:
-
Click the gear icon next to the "Actions" column
-
Use checkboxes to show/hide columns based on your needs
-
Rearrange columns using drag and drop to prioritize the most relevant data
Exporting Results
To export your test data, click the download icon in the Results section. Exports are provided in Excel format for deeper analysis, reporting, or record-keeping.
Please note: You will export only the currently filtered results if any filter is applied.